
CSM Start Page 3
Circular Sock Knitting Machine BASELINE setup by Karen Taylor
Baseline (similar to a “factory setting”) is an essential and universal default setting applicable to all Circular Sock Knitting Machines. We set our machines BACK to baseline if you are having issues in trying to get your CSM to correctly knit.
THIS IS NOT A NEW CONCEPT - IT’S FOUND IN ALMOST ALL VINTAGE CSM MANUALS (in some form or another).
One can use a variety of specific fibers to set baseline from doily cotton (#10) to light fingering or fingering weight scrap or sock yarn. If you aren’t sure - try the fiber - not all thicker fiber works on a CSM. Not all fiber will be compatible with your CSM needle/slot clearance so when learning be sure to not start with worsted or thicker weight yarn.
Note if you are trying to find the correct machine tension for a specific fiber, you’re going to have to be using that fiber (see step 4).


ONE) Yarn Carrier Height
Adjust the height of your yarn carrier focusing on the yarn path coming out of the yarn carrier and into the needles. Adjust the height so that the yarn is fed into the machine with the closest needle and the yarn aligning that closest needle between the hook and its latch. This setting has some wiggle room - the most important thing is that the yarn feeds directly where needed.
My own yarn carrier is slightly low to accommodate using my Ribber timing (to be covered later).

TWO) Yarn Carrier proximity to the cylinder needles
It is essential that the carrier sits as close as possible without needle collision. When changing cylinders this proximity setting might need additional correction.
Want to see what this should look like? See the video to the right or see this link.
THREE) The Tension dial setting
The tension dial although might look different depending on which circular sock knitting machine you actually have, most function the same:


For most CLOSED CAM (like the Legare) set the dial to the approximate mid-way point (pointer not all the way up or down but mid-way). For the OPEN CAM machines (Autoknitter, vintage Gearhart and modern Erlbacher) just play around until you find the approximate mid-point.
If using an OPEN CAM like the Erlbacher machine, the general approximate factory setting is 7 to 11 threads showing above the brass colored cam nut (be sure not to unscrew this too tight or loose). You can also take a ruler and measure between the very top of your cylinder and the top of the upside down V shape of the cam. The factory setting is a minimum 1 1/4 inches (3.2cm).
Some people choose to purchase a digital set of calipers to approach setting the cams with more precision - however it isn’t necessary (unless you prefer it).
Special thanks to Martita for the Erlbacher Gearhart photo :)
FOUR) CAST ON
Continue with your Baseline settings with determining the correct machine setting for the fiber you are using, please Cast On. Unsure how to do that? Let’s check out the CAST ON page.
If you are attempting to cast on and the yarn IS NOT forming a stitch (it is just creating a line of yarn - STOP IMMEDIATELY, adjust and restart) there might be a variety of reasons including tension dial set too tight (wrong yarn? or more).
Is this your first time Casting On EVER? Consider reading the sequences of pages starting at CSM Start 1 for the many other factors involved with setting your machine up from cylinder marking, tables and supplies.


If the yarn carrier is correctly aligned, your yarn path will easily feed directly into the machine even if a needle drops. Please note that turning the machine handle when there is no yarn threaded into the machine can lead to cylinder needle latch collisions with the yarn carrier that may not be visible.
Note: A too-loose or too-tight cylinder spring might hinder correct needle function. A machine loaded with yarn too thick for it or with a tension dial set too tight or loose will result in correct stitch knitting.
Want to see more? See the CSM CAST ON page.
FIVE) find the baseline or best tension setting for the YARN you will be using.
Having already Cast On, with the fiber you will be using for your project, turn the machine handle VERY slowly and watch how the yarn behaves as it is fed into the cylinder needles and is knitted and the needles are raising up.
Now we will adjust the tension dial only in one direction (turning it half a turn on each adjustment), and then work a couple rows of knitting by turning the handle (or cranking as we refer to it). Do each half turn adjustment and row working slowly.
Normal knitting on the machine will rise slightly and then drop back to the machine on the needles. The idea is to tighten the stitch tension followed by working rows until it causes the knitting to rise up and remain on the needles without dropping back down (see photo on the right “tension too tight”). STOP
You have found the too-tight to knit ‘correctly’ setting. If you proceed without pushing the knitting back down to the base of the cylinder needle then you won’t correctly knit.
Adjust the dial back 1/2 a turn AND BEFORE doing anything, pull down on the knitting to ensure the stitches are on the lowest part of the needle so that the latches can correctly function once the handle is again moved. Slowly turn the machine handle again to test and ensure stitches are once again behaving.
TIP: Turning the tension dial clockwise will tighten and anti-clockwise will loosen tension on the Legare vintage machines.
NOTE: The Erlbacher tension dial will click when turned so we recommend turning that tension dial a half turn (or 2 clicks).
YOU’VE FOUND IT!
This is your baseline for this yarn on this cylinder. This means with this setting this yarn will correctly knit. (However note you are not limited to JUST this setting).
Each different yarn company will have its own ‘baseline’ however if you tend to stick with the same yarn or yarn content ratio, you generally won’t have to do this more than the single time.
Your machine knitting should look like this (see ideal successful stitch image). You should be able to a snug hug of yarn around the needle that isn’t too loopy or tight.
Each machine, yarn and machine setting can vary on the baseline so this is one reason why its a good idea to do. The other reason is to consider this…
Knitting on the CSM is being stretched out - kind of like being on a stretching rack. One cannot honestly know how long or wide a worked piece of knitting will be while its still on the machine. It is ONLY once off the machine, rested for a couple hours/overnight and washed/hung to dry will its true dimensions be known. The baseline lets the yarn tell show us what it prefers to knit at in terms of tension dial settings.
(Yarn labels include recommended needles and gauge when hand knitting or crocheting - this is how to find how your machine talks with that yarn).
Why you can’t judge a book by its cover - the knitted stitch gauge while on a circular sock machine.
I heard a new circular sock machine user recently say that when they saw this yarn on the machine with the large stretched out stitches - that the machine wasn’t making a gauge stitch they would like.
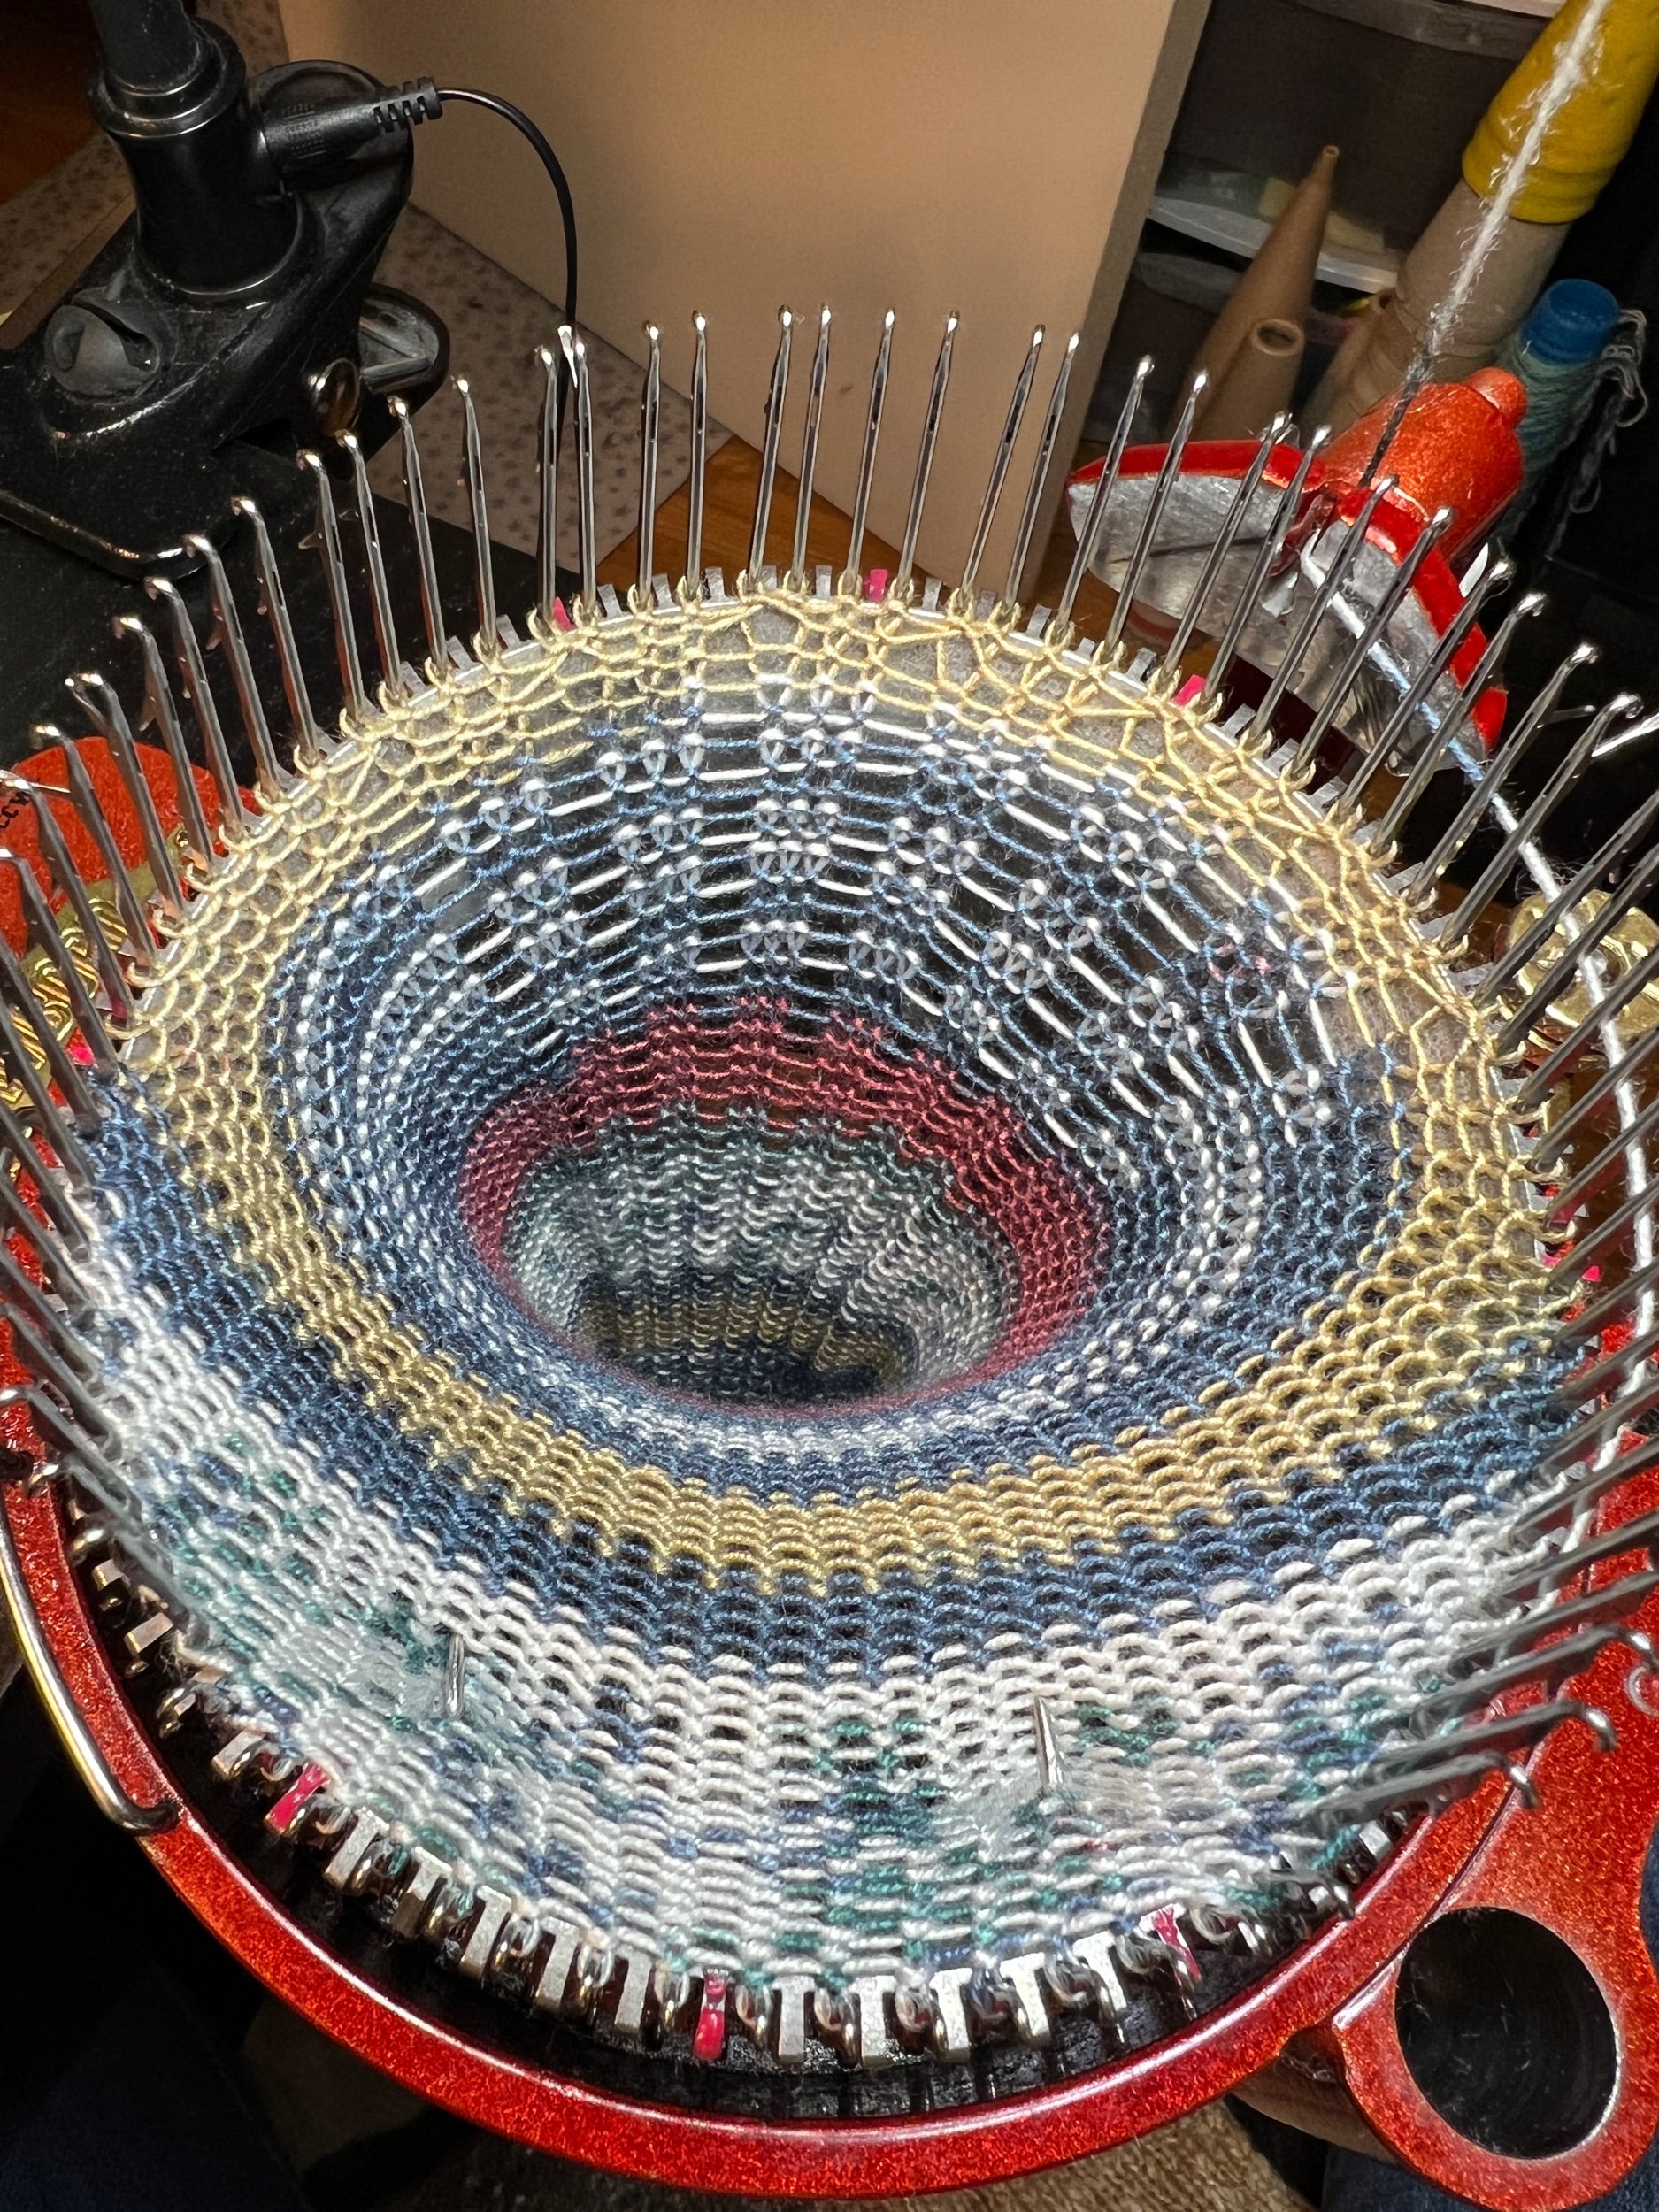


Off the machine and rested these socks showed their true colors (and nice stitches). Yarn: Loops and Threads Perfect Pair in shade “1023 Fire”. Fiber contents: bamboo, polyester and acrylic.
SIx) IDENTIFY YOUR STITCH TENSION DIAL AND SET IT TO ITS ZERO POINT


In order to have the ability to set and reset your machine in the future back to a predictable setting you need to understand the ZERO POINT - the tension dial is a dial and is all you need to successfully come back to any desired setting if changed.
Shareable link to YouTube Video: https://tinyurl.com/TensionDialZeroPoint
In order to set the dial to the ‘o’ (tightest point) you need to first cast on and then switch to the project yarn you might use. TIP1: You can ONLY setup the marks with the machine threaded. TIP2: ONLY read/adjust the tension dial at the SAME point on the cylinder whenever adjusting - I always do so at the 6 o’clock cylinder point. cast on.
HOW: On the Legare, Autoknitter and vintage Gearhart style machines - gently turn the dial all the way up to its tightest point. Mark the horizontal surface of the dial on the side of dial closest to a memorable point on the machine (I use the 6 o’clock mark on my cylinder as noted) this mark is your full turn mark. Now although I didn’t mark it on the image you see on the right, we know that the opposite side to the mark is the half turn mark.
When the dial is at its highest or tightest setting, machine threaded, and the marked full turn mark towards the cylinder at 6 o’clock=this is the zero point. How tight or high the dial will turn changes with yarn properties of each new yarn and different cylinders used so consider these points.
Now whenever using this cylinder you have a zero mark. Turning one full turn etc you can better note setting. Understanding that different slot cylinders will change zero slightly (on my 96 my zero when loaded isn’t zero. We mark the dial this way to better control and track reproducible settings on the machine.
I’ve recently been making all of my ribbed cuff down socks using two dial turns from the tightest setting on my 72 needle slot cylinder. Most of the time with the heel spring engaged throughout the whole sock, this tends to produce a 9 stitch/12 rows an inch gauge (which I’ve come to prefer).
THE MARKED TENSION DIAL
SEE MY BLOG ENTRY! The difference the Tension Dial setting make Oct 16, 2021
All machines have a version of this stitch tension setting dial. Avoid dismantling this part and its two screws.
Understanding how to read or better use the marked tension dial in your machine is essential most machines you turn the dial and a pointer indicates a number of some kind.
While some machines have an audible click (as mentioned above in the baseline settings of the Erlbacher Tension Dial), when their tension dial is turned, many of the vintage dials like those on the Legare only have a pointer with numbers on the top of the dial while Autoknitters and vintage Gearhart machines just have numbers on the top of their dials.
Regardless of machine, when it comes to the tension stitch setting, for a more precise control of the tension dial we ignore the numbers printed on it (and/or the pointer on the Legare which doesn’t work well) and simplify the dial with a full and a half turn set of nail polish marks on the face of the dial once the cylinder has fiber threaded and a couple rows have been knit.
Attention AUTOKNITTERS, ERLBACHER, Tru-Knit, and VINTAGE GEARHART (OPEN CAM) MACHINES…
YOU DID EVERYTHING RIGHT ON YOUR OPEN CAM MACHINE BUT…
A note specific to OPEN CAM machines (like AutoKnitters, vintage Gearhart and modern Erlbacher machines): If correctly assembled and attempting to later cast on and noting the needles aren’t correctly going high enough to release the trapped latch - the needles aren’t correctly moving to create a stitch (with the machine at the correct tension), there’s a high probability the upthrow cams or cam lifters, the things that look like a teardrop, are riding on top of the needle butts instead of below (at least on the leading cam in the direction you are working). If 6 needles are lifted out of action, crank slowly forward, this allows the cams to drop down. Once these needles are free of this area they should be pushed down into working position, knitting can proceed.
If the machine is cranked backwards this can happen, the one downside to machines like these. Once this is understood it rarely happens again. It is not a fault of the machine just a learning moment. This is never an issue with CLOSED CAM machines. See the CORRECT view of the upthrow cams on this shareable YouTube link: https://youtu.be/RsG00DlffVE?si=P4uD1LJHlNbDLVs3
An example of what this looks like when wrong
To mark your cylinder please see my Feb 8, 2019 Cylinder Marking blog entry.
HOW TO KNOW HOW MANY ROWS ARE NEEDED TO MAKE A SOCK OF ANY SIZE?
Also see reference GAUGE / SWATCHING on the INDEX page.
GET TO KNOW THE TENSION SETTINGS OF YOUR MACHINE WITH A SWATCH!

Please note there is NO correct chart you can buy to perfectly tell you how many stitches you would need on YOUR machine (although indeed there are reference charts on etsy).
Why can’t you use a chart, a sock ruler or some on-the-go method to make predictable socks by size?
You need to use YOUR MACHINE with YOUR YARN on YOUR CYDLINDER OF CHOICE, AT YOUR SETTINGS and YOUR SOCK DESIGN in order to knit something, add scrap to take it off the machine and then let it rest a couple hours to overnight and THEN wash/hang to dry to determine the rows and stitches per inch (and dimensions of that piece/sock).
Don’t worry - all is not lost. Create a GAUGE SWATCH with the yarn you will most often use. This will give you the KNITTING OR PROJECT BASELINE.
See my Gauge Swatch Blog entry - 2018 Oct 13 - Determining CSM Gauge
For more photos/etc see the Ravelry entry
Don’t do this with the most expensive yarn you have - I used Michaels Craft store purchased Lions Brand “Sock Ease” sock yarn in two colors making a swatch on my 54 and 72 slot cylinders. I worked each segment in 30 rows and measured the segments on the machine and the next day off the machine but didn’t note that info until after I washed and hung it to dry.
WHY SHOULD YOU BOTHER? By having this info on each tension setting you then have a baseline reference going forward. You don’t technically have to do more than the one for each cylinder. Without creating a gauge swatch you are simply guessing and sometimes that is more frustrating then dropping a stitch.


I also find keeping extensive notes helpful. I use Ravelry projects for each of my projects, noting yarn info, yarn weight used, method and row counts which produced what sock size after finish/wash/dry. I also keep notes in a spreadsheet for quick lookup and sock size planning.
Note that what ‘recipe’ or sock design you follow can make a huge difference in the fit of a sock. I find my Cuff Down Mock Rib Shortie sock foot segments longer on the actual foot than my Cuff down Ribbed Socks. Perhaps its the heel difference? See MY SOCK YOUTUBE VIDEO page for videos and step by step written patterns.
Why can’t I just tell you how many rows a sock has?
As mentioned, different machines with different cylinders, settings and yarn can create a wide variety of gauges which mean X rows can be much longer or shorter when compared. If wanting to know the general info feel free to check my Ravelry projects as each sock project indicates number of rows for cuff, leg, pre-heel, heel style, and foot. MY SCRAPBOOK page has a great visual record of the socks and other projects I’ve done in an organized way.
SOCK SIZING ACCORDING…
To the Griswold Circular Knitter Vintage Machine Manual

The following is an excerpt from the vintage manual mentioned above and referred to on the right in the chart.
The preceding measurements have been carefully prepared from socks and stockings actually knitted in our factory, and are therefore in the main correct. So much, however, depends on the quality of yarn employed and the tightness of the knitting, that they cannot be followed absolutely, but are only to be taken as indicating the approximate number of rows required.
The best way to obtain correct sizes, is to use an ordinary yard measure; and while the sock or stocking is in progress put it up under the machine as high as it will go (temporarily removing the weight), and measure the work against it allowing 2 inches for toe and 2 inches for heel so that supposing you r require a sock of 9/5 inches in the foot the leg should measure 10.5 inches (commencing from the top) before the heel is made. The heel and foot should be 8 inches and the toe about 1.5 or 2 inches.
Add about 0.5 an inch of knitting for each size larger in the leg and foot. (“=inch)
As a rule, stockings should measure as follows viz :-
For 8” foot.. 23” leg
For 8.5” foot.. 25” leg
For up to about.. 28” leg
for a man’s stocking.
For 6” foot.. 15” leg
For 6.5” foot.. 17” leg
For 7” foot.. 19'“ leg
For 7.5” foot.. 21” leg
The operator may prepare herself a table of sizes, by knitting a few inches of web of the required tightness, from the yarn to be used; then without stretching it in either direction measure with a rule one inch in length, and count the number of rows. Multiply this by the number of inches required for the different parts of the stocking making due allowance for the length of the heel and toe.
The upper part of the leg of a stocking should be knitted loosely, and the stitch gradually tightened above the ankle.
We have given the gauge of the cylinders best adapted for each kind of yarn, but oftentimes the best yarn can be knitted equally as well on a cylinder one or two grades coarser or finer than that designated. For instance, socks from the extra-super fingering can be made equally well on the 72 as on the 84 or 96 cylinders, provided that all the machine needles are used, as in the leg of a stocking, instead of leaving out every fourth one, as usual.
The measurements given for the legs and ankles of stockings are exclusive of the number of rows that are knitted while the narrowings are being made.
When a 1 and 1 ribbed top is not required, the first two columns are to be added together for the length of the leg.
Ladies stockings are usually preferred with the scalloped tops but if 1 and 1 tops are required, the measurements for the leg are to be taken from the sizes given for men’s knickerbockers.
PRESSING.
Cotton yarns should be knitted as tightly as possible and articles washed with soap and hot water (or even boiled) before they are worn.
Woolen or worsted stockings however should be drawn on to wooden form, or block, of the required shape then a wet cloth having been laid upon them they should be pressed with a hot iron. Any other woolen article should be dressed as follows: Lay it upon a flat surface, or ironing board, and place over it a piece of old cotton cloth wet with clear water, pass a hot flat iron lightly over the cotton until the steam has penetrated and damped the work; then remove the wet cloth and place a dry on e over it and press until quite free from moisture.
Special thanks to Pat Fly of www.angoravalley.com for providing online CSM manuals on her website
A further note on Tension - using the Heel Spring…
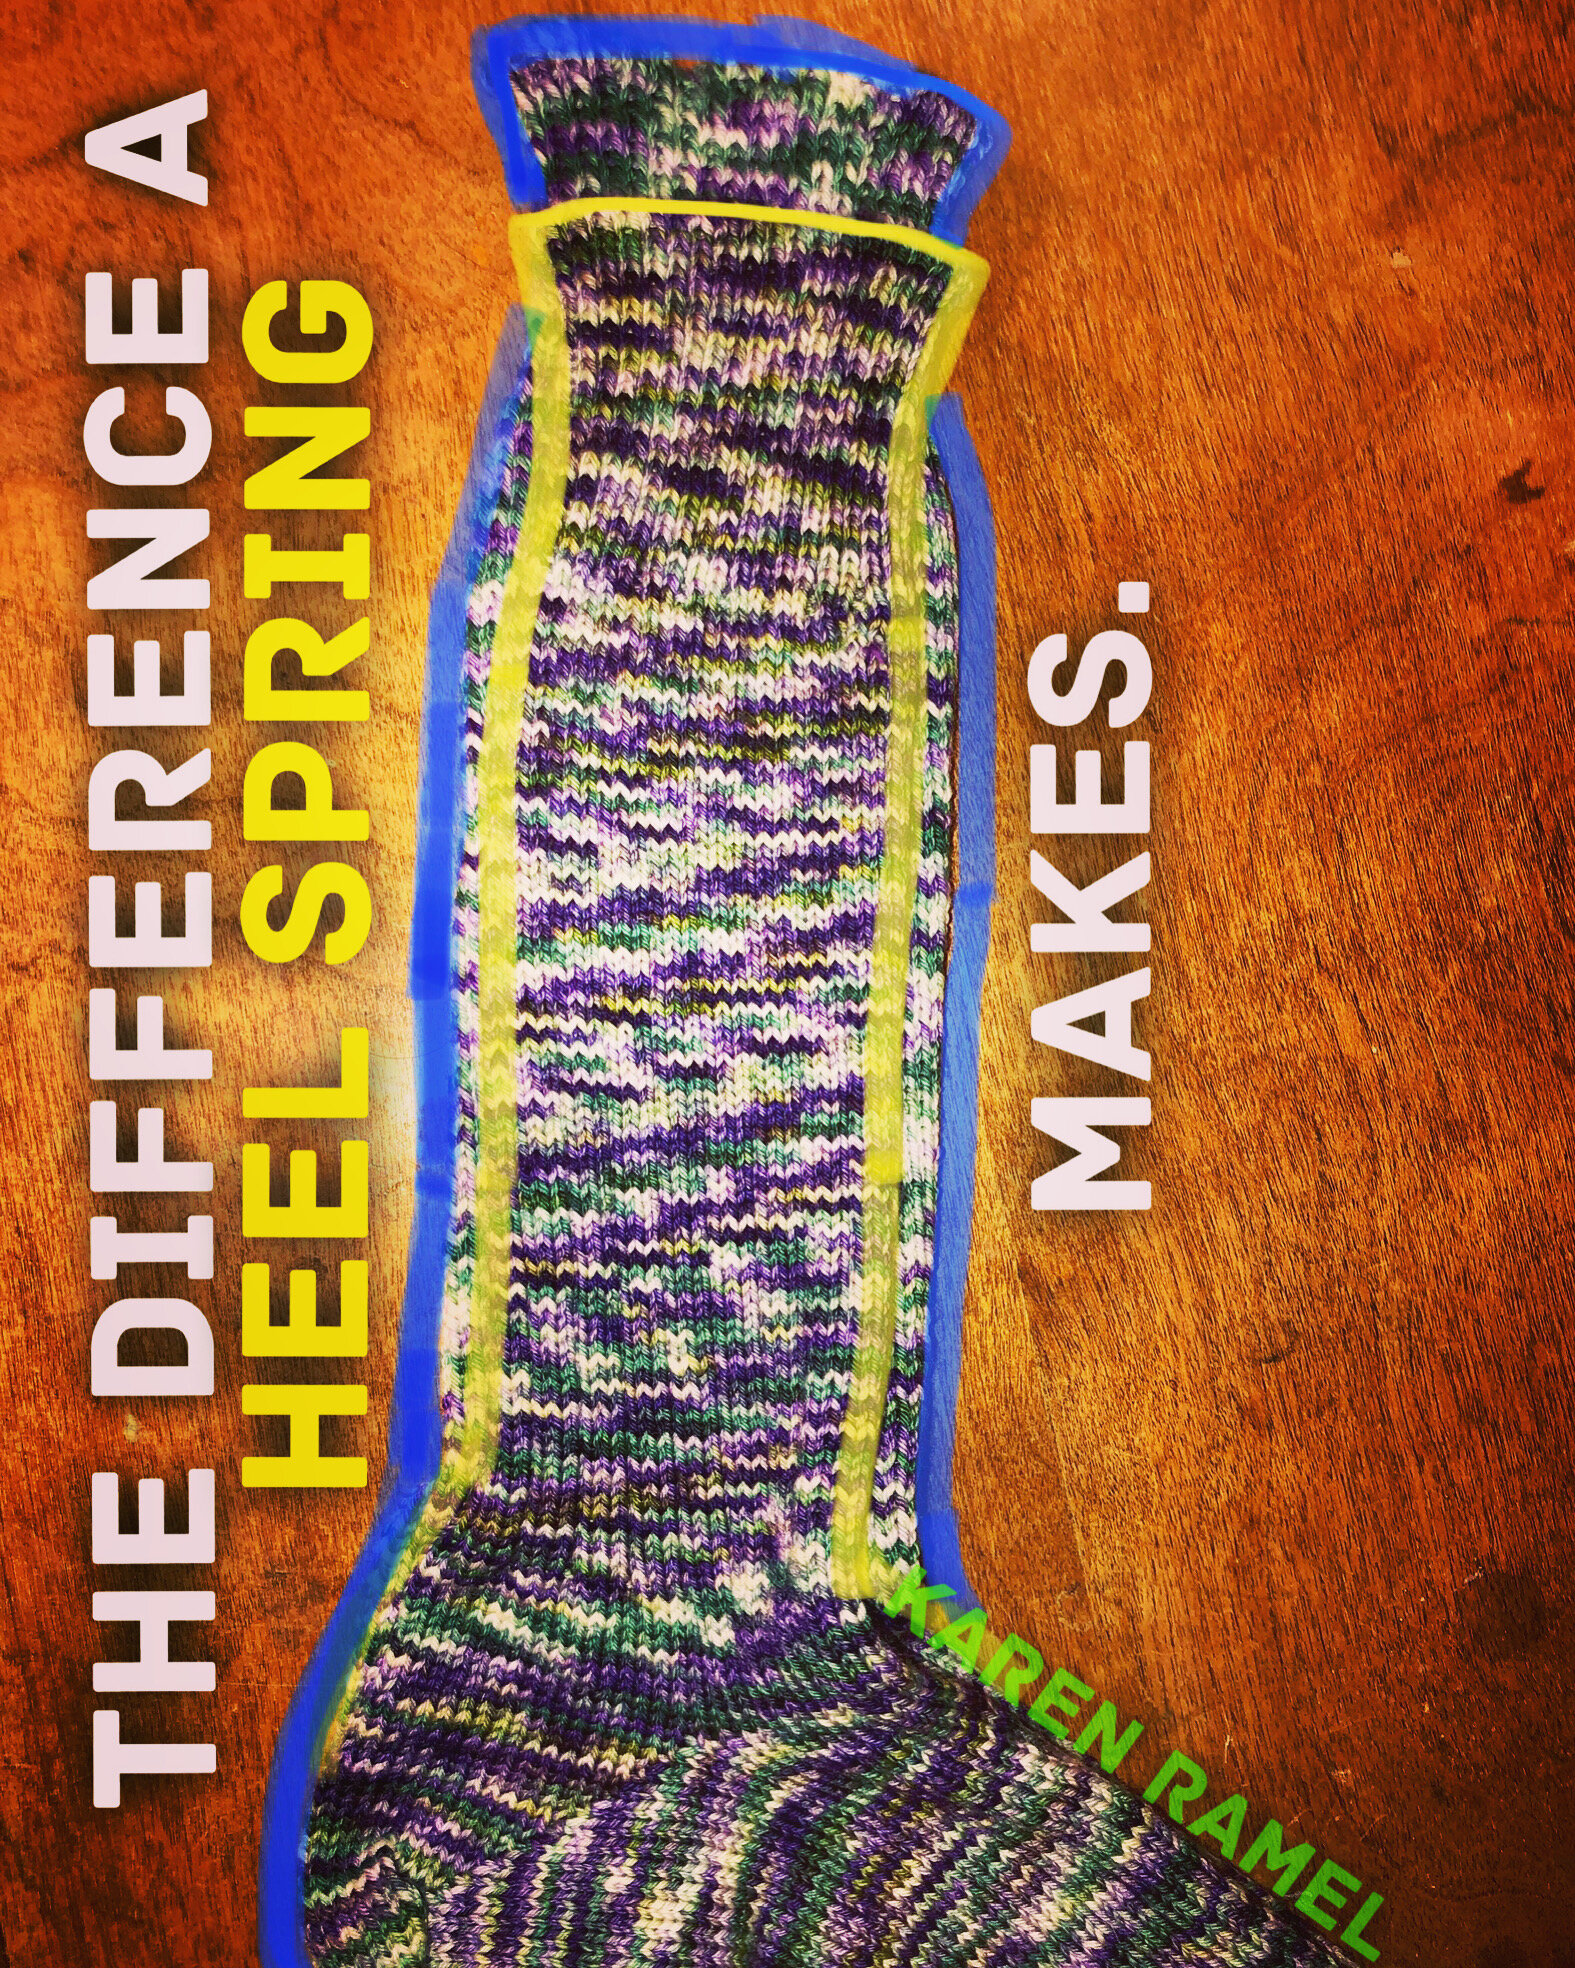


The difference using the Heel Spring (or not) on your sock makes (when all else is the same).
The yellow outlined sock was made with the Heel Spring engaged for the whole sock while the blue outlined sock had the Heel Spring engaged from Heel to Toe. Knitting of the blue outlined sock is 1.5cm wider and twice that longer than the yellow outlined sock. Further detail on these specific socks can be found on ravelry socks 154 & 155.
I‘ve come to appreciate my socks with preference for the Heel Spring to be left on from Heel to Toe. I haven’t decided yet whether I prefer the Heel Spring from Cuff to Heel.
These were all created on a vintage Legare 400 with two dial turns from the tightest setting using a 72 slot cylinder (with compatible ribber).
The Heel Spring on the Selvage of the sock example uses my favorite selvage (See how to make your own Cuff Down Ribbed Socks on MY SOCK YOUTUBE VIDEO page) - This example added the Heel Spring while using scrap a couple rows before switching to sock yarn at the 3pm position. The Selvage outlined is: 1 row of 1K1P ribbing, 2 rows of knitting, return to 1K1P ribbing with one complete row with the Heel Spring still engaged prior to completely removing Heel Spring for the Cuff.
HOW I MAKE MY PREFERRED SOCK:
Generally I prefer ribbed socks worked cuff down - currently 1 knit x 1 Purl ribbed cuff then switched to 3 knit x 1 ribbing then switched so there’s a 10 row plain knit segment in the Pre-Heel (above the heel between Leg and Heel). I then tend to remove the ribber (correct any issues) then work a no-wrap regular heel. I return the ribber to the machine and continue working plain knitting on the foot underside while wiring. The 3x1 only on the top of the foot. I remove the ribber and work one plain knitting row then work the no wrap toe, add scrap and 4 stitch markers (marking first and last stitches on both sides. I then finish that sock by setting up for the next by swapping the cylinder needles out: empty slot in first slot after 3 o’clock with each second stitch placed on its neighbor for a quick ribber add when starting the next sock.
How do I size a washed finished sock? See Feb 19/21 blog. | Also see the INDEX page |
There’s more info! See the next page in this segment: CSM Start Page 4
THIS PAGE IS A WORK IN PROGRESS. Please stay tuned.