This post is to help provide a quick look up on this topic going forward. I covered using the Knit Contour (Knit Radar) when using it to create the Cat Hammock covers and the Teddy Bear.
BLOG ENTRIES
I am reviewing this topic today while watching this YouTube VIDEO. (12:17 time mark).
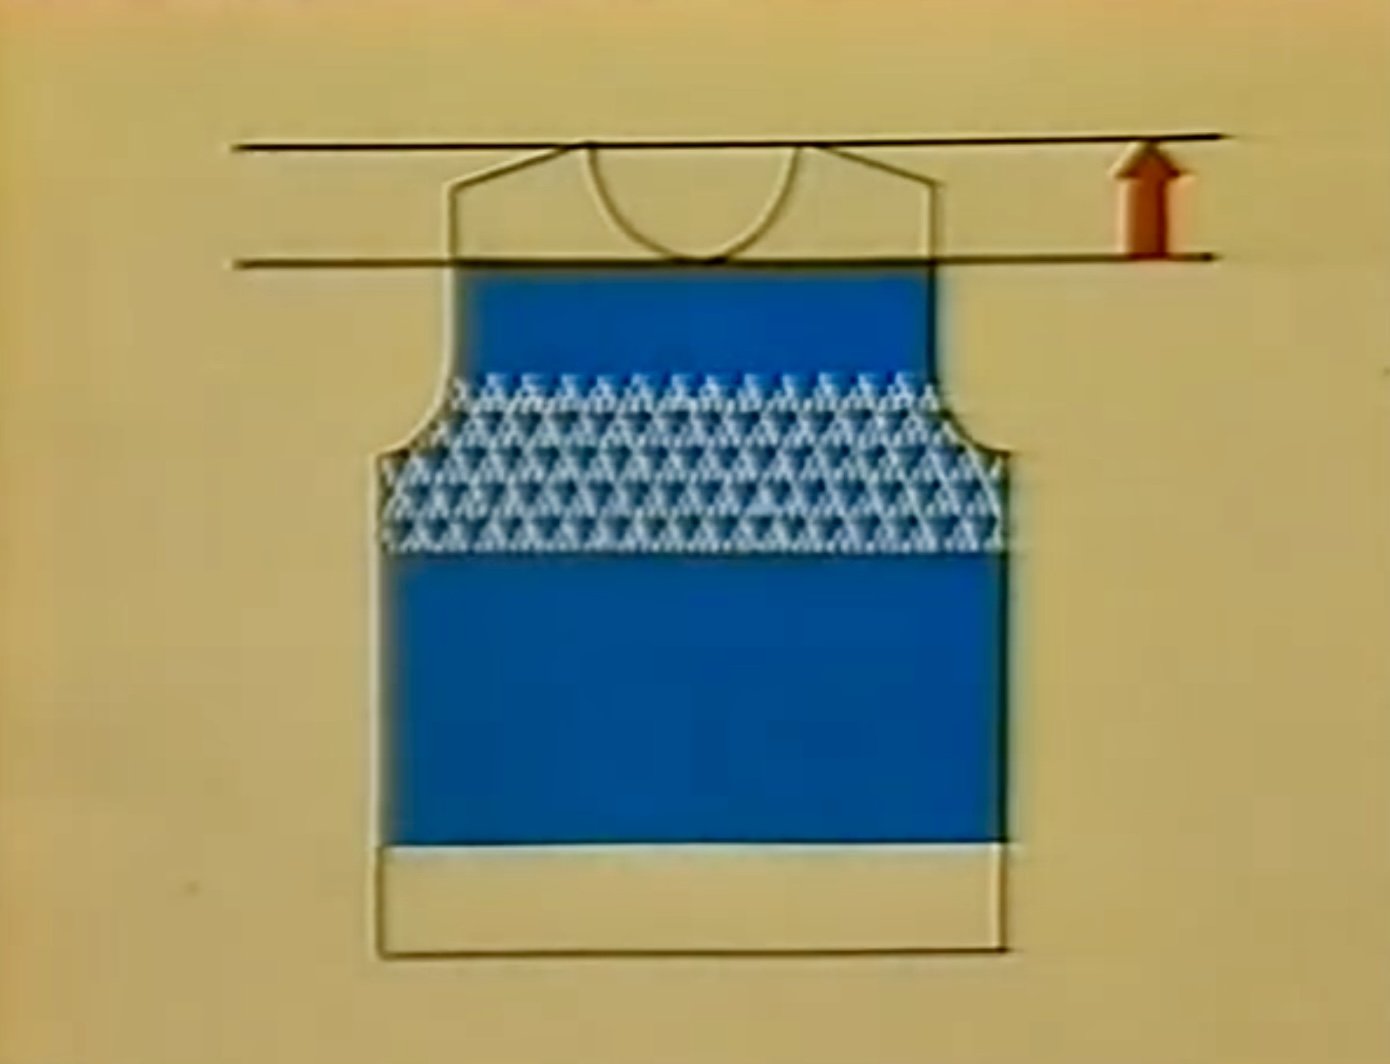
The video reviews choosing a pattern paper and setting the knit contour - Choose your favorite style from the 17 different styles. They chose the pullover pattern and chose size C.
Measure yourself. Should your measurements be significantly different you can adjust the pattern.
These instructions use the tension swatch noted earlier. Example 30 stitches and 41 rows
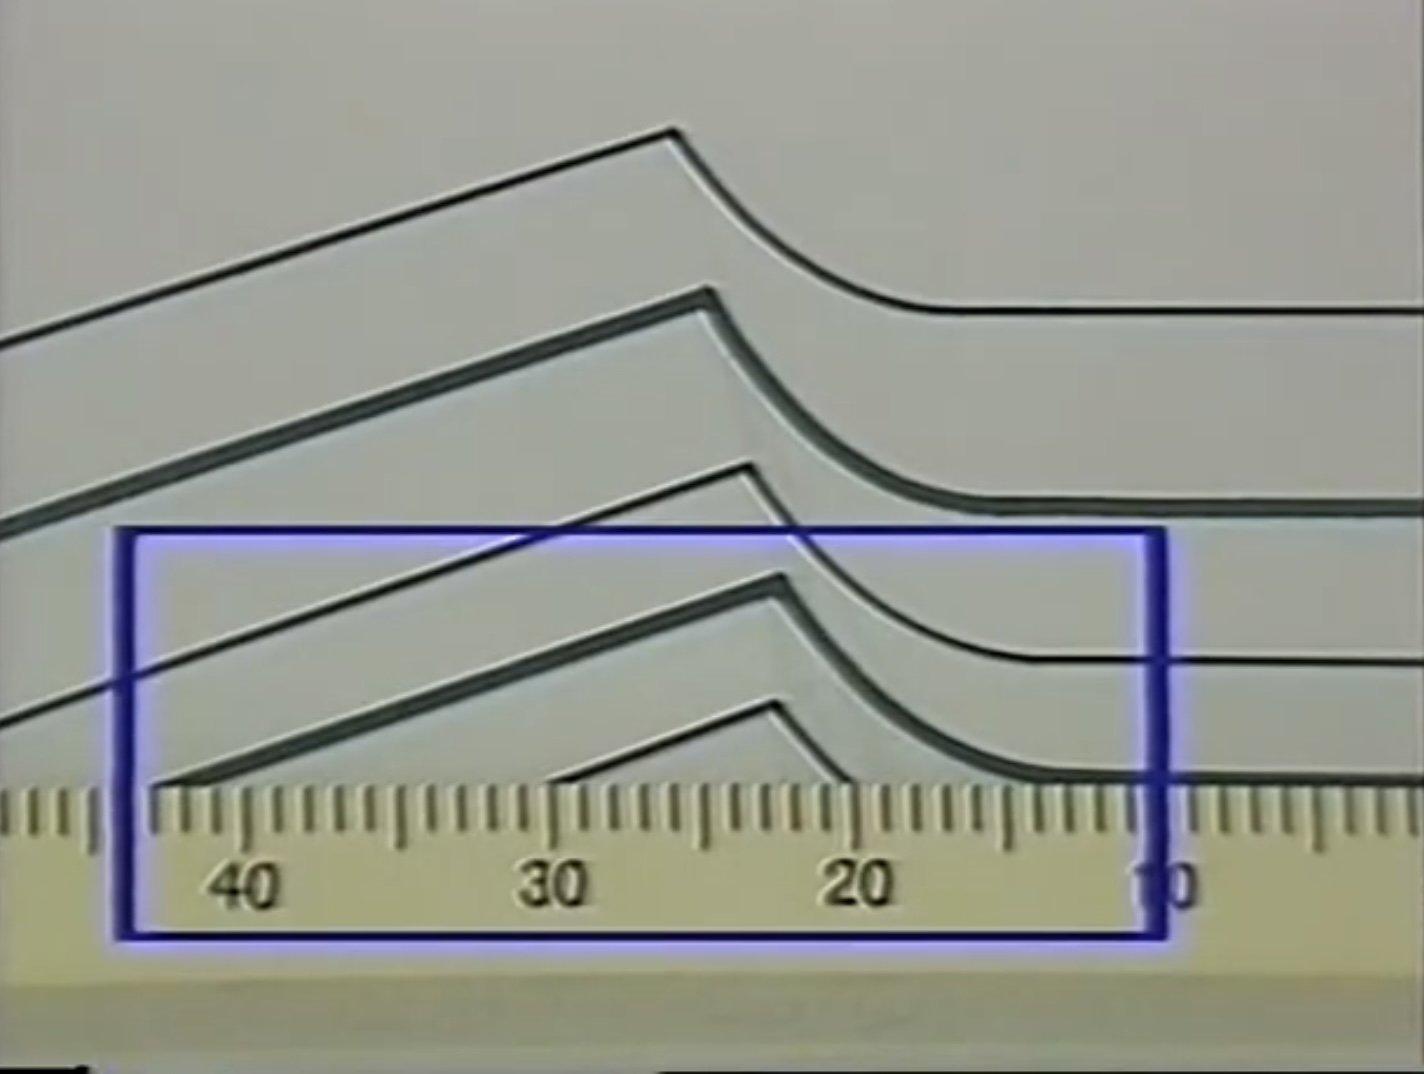
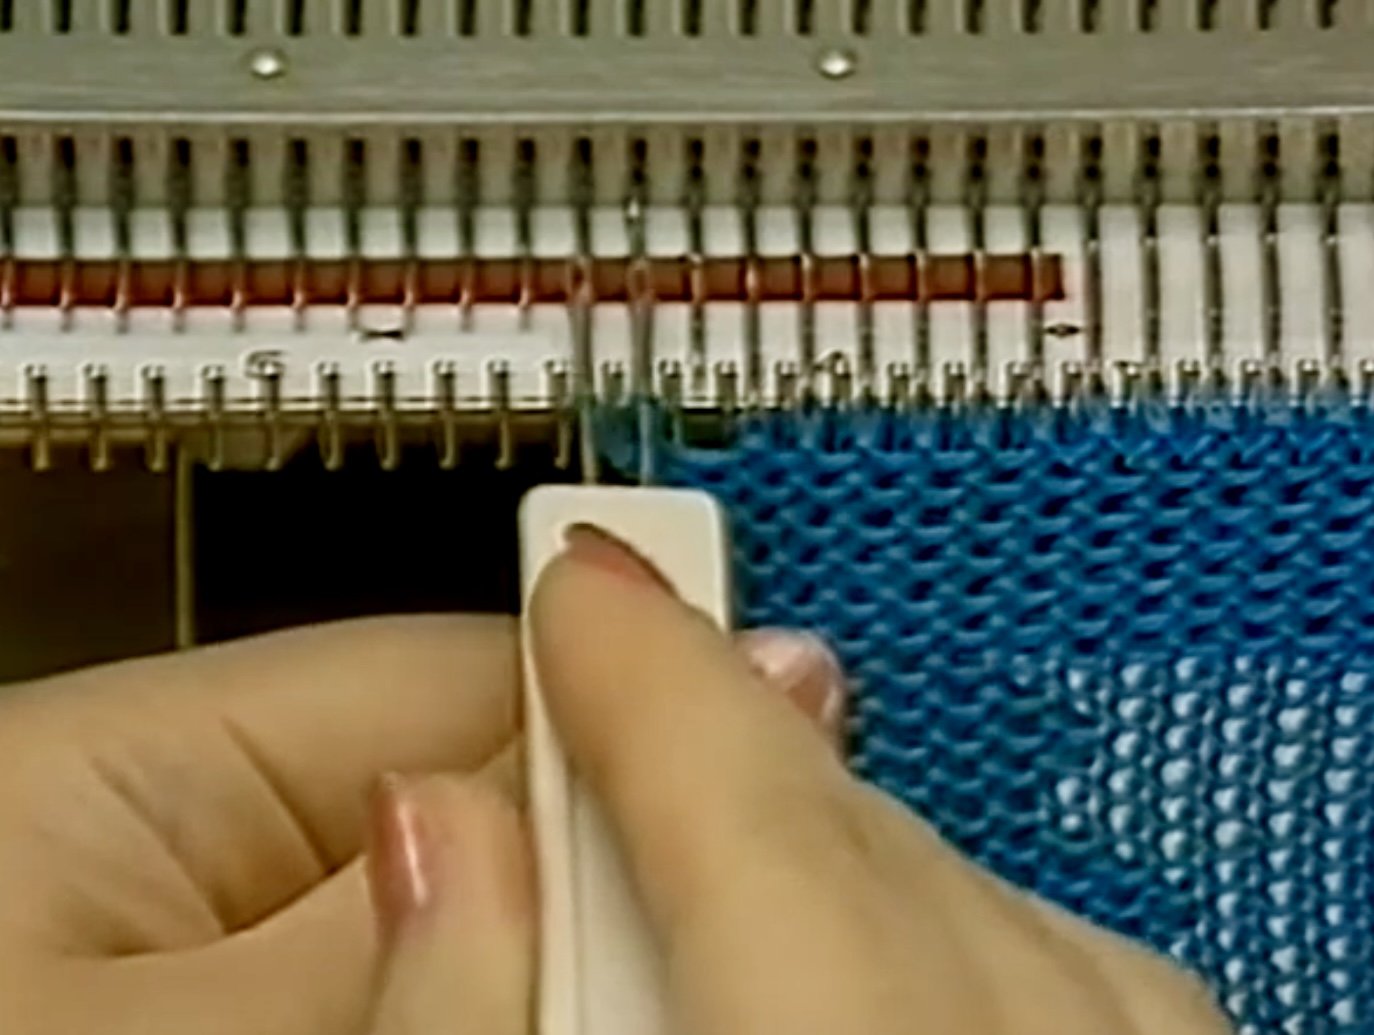
Set up the knit contour by setting the correct reference ruler into the machine.


THREE DIALS TO SET: Set the far left dial to the knit contour to reflect the 41 rows. Depending on whether the pattern is a 1/4 or 1/2 scale (this example is using the half scale) - Ensure the selector above the middle dial is set to the pattern scale (EXAMPLE IS 1/2 scale). The middle dial will help feed in the pattern into the machine. Feed the pattern facing you so that the center pattern vertical line is aligned into the paper feeder. Sure you’ve aligned 0 to the center line of the pattern.
KNITTING THE BACK (14:52 time mark) - Back Front, sleeves, neck band. The ribbing waist “the welt” is knitting afterwards.
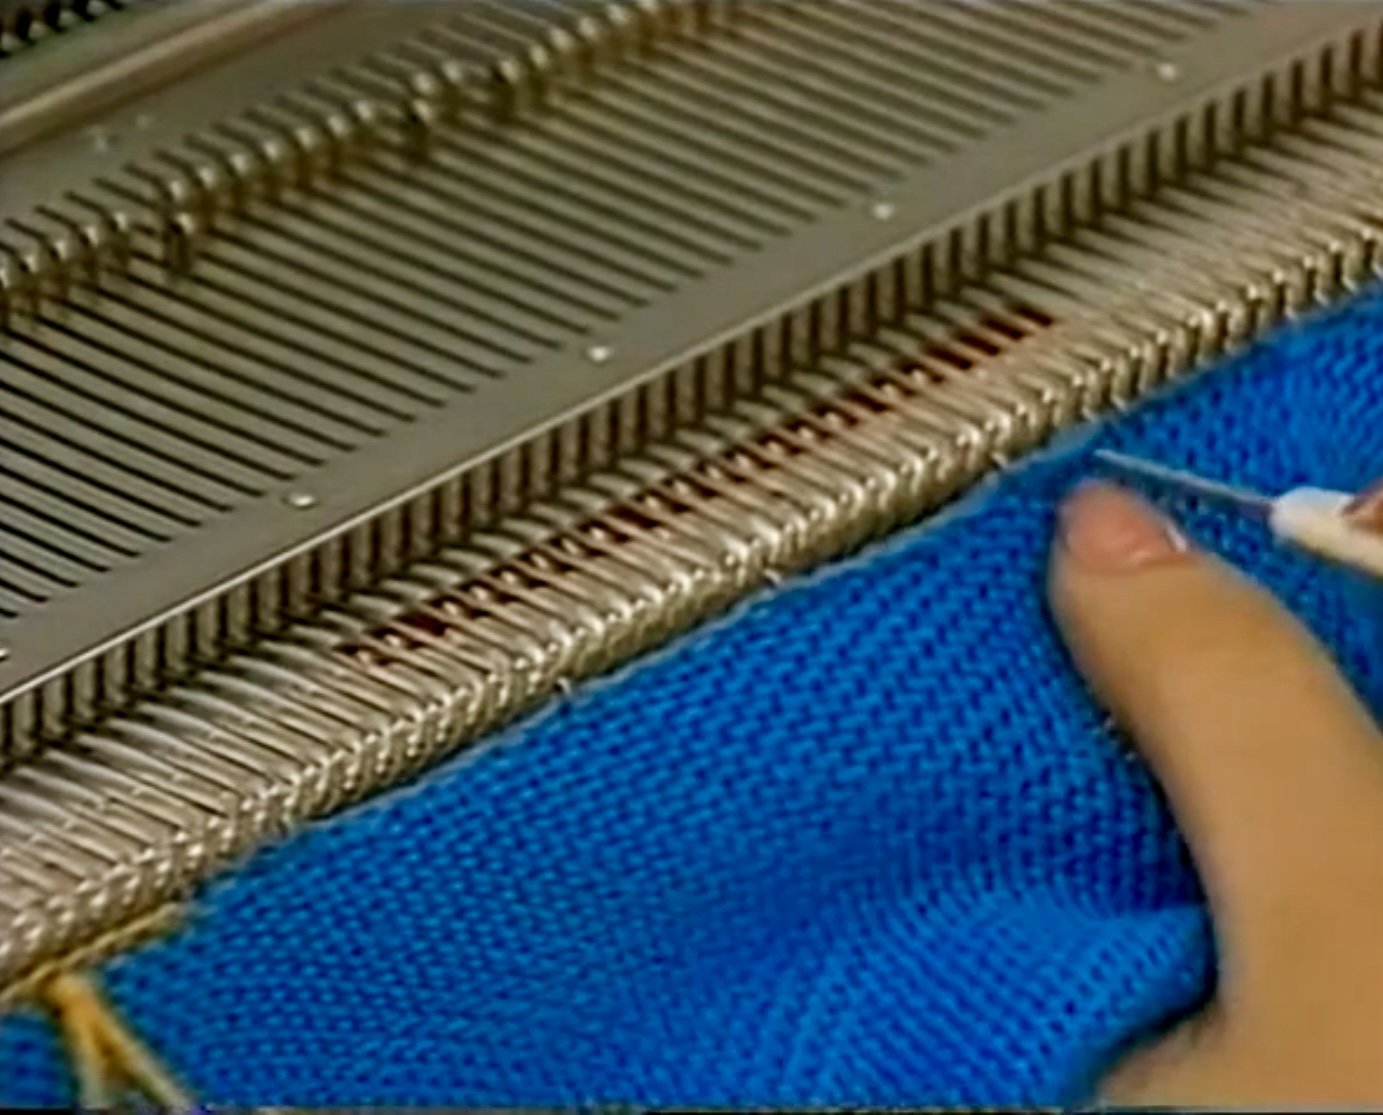
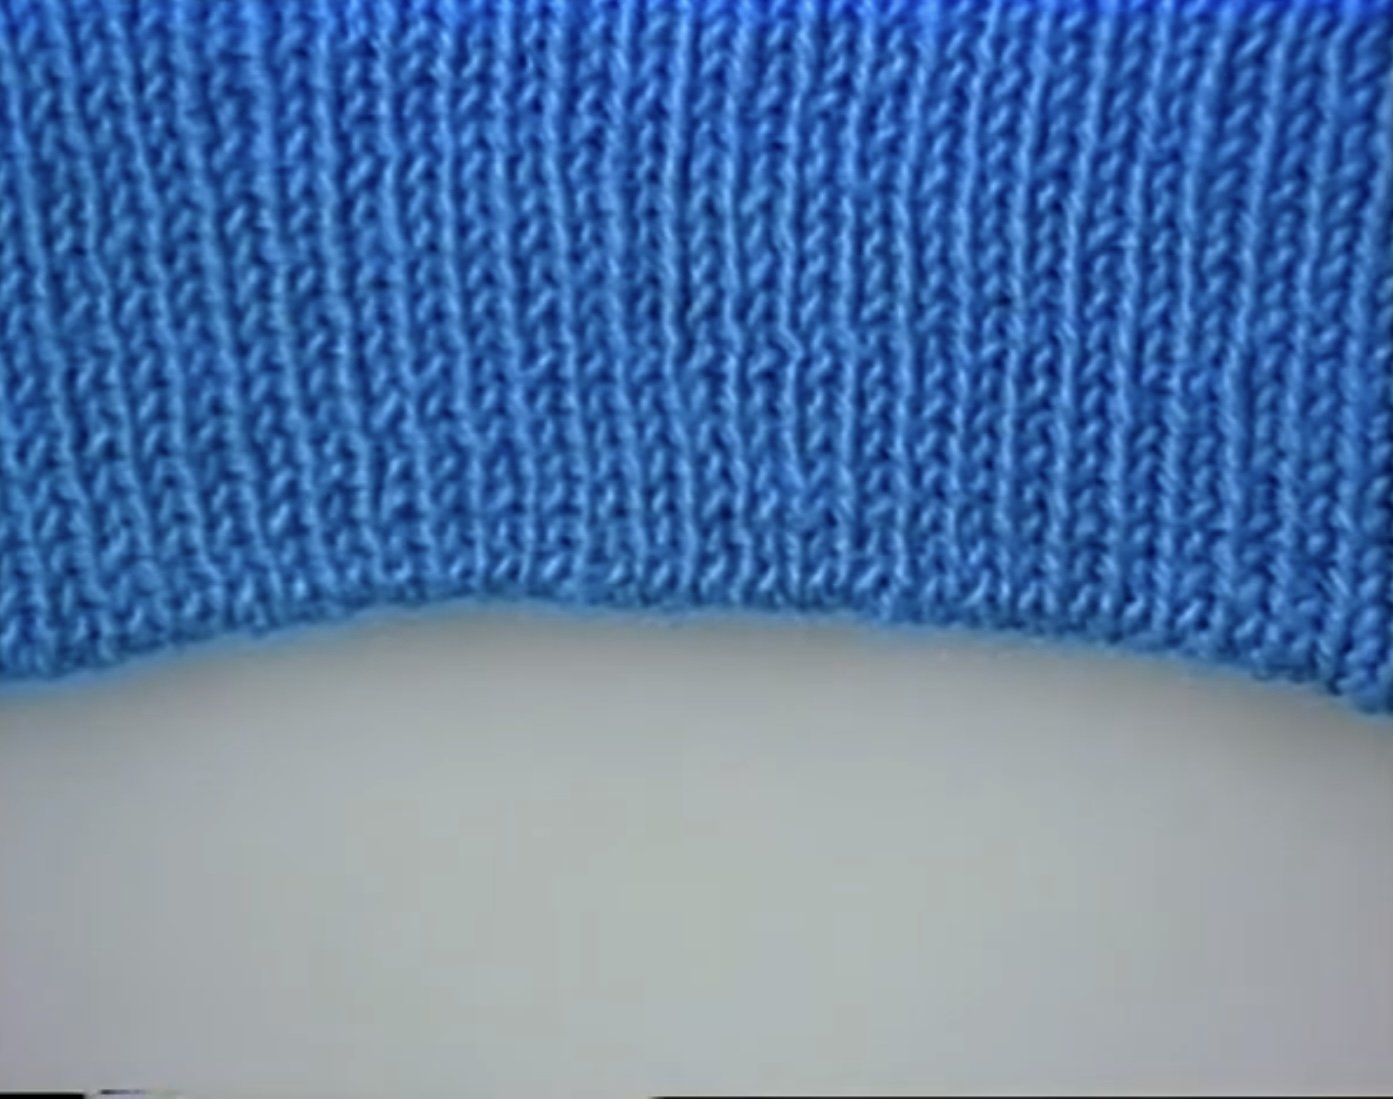
Knit 1 Purl 1 rib. The ruler reference tells us how many to use. Start with waste yarn. Knit one row of RAVEL CORD before project yarn. When knitting in WASTE YARN - be sure to lock the paper pattern feeder by turning the far right dial to the 3 o’clock position. When resuming the garment return the setting to reflect the gauge found (this example 30). If working the sweater in stockinette then set side levers up. Knit and note pattern paper movement. Knit from waist to arm hold beginning. Armholes are created by decreasing.
Should you need to decrease more than two stitches you can ONLY do this on the carriage side. (TIME MARK 17:46) METHOD: Transfer tool - two stitches together. Push empty needle to A position. Then bring needle holding two stitches into D position and using yarn path to carriage, wrap into latch from right on top and create manual stitch through other two stitches held on that same needle. Repeat as needed.
(TIME MARK 19:13) When knitting decreases ONE stitch on both sides - transfer outside needle to one in. Be sure to hang claw weight to reduce tight knitting. Bringing decreased stitch to the D position helps things stay in place.
(TIME MARK 20:05) SHAPING THE SWEATER SHOULDERS requires partial knitting while decreasing the stiches while following the contour line up to the back edge. USE this method when the decrease is MORE than the total number of rows knitted. Realize the number of decrease needed. (TIME MARK 20:22) Push the required number of decrease needles to the D position on the OPPOSITE SIDE of the carriage (so in this example here five needles are out completely in D position - on the LEFT - PICTURE). Set BOTH RUSSELL LEVERS TO ONE (PICTURE). Knit one row moving the carriage from the right to left. (TIME MARK 20:46) now on the left the final needles (in this example the final five are in D position still) the last needle knitted was the 6th from the left and the yarn path sits on top of all the left 5 D position needles - redirect yarn path under the far right extended needle and then up and over the far left four D position needles (PICTURE). Prevents the possibility of a hole developing on the left decrease. The carriage is still on the left, now extend the needed number of needles on the right (5 needles moved into D position). Knit from left to right. This completes the first step with partial knitting. Redirect yarn path on the right like we did on the left. Continue decreasing as indicated. Remember to hang the claw weights.


We don’t extend needles into the D position on the side where the carriage is because when the row is knitted there will be a unknitted yarn path across the extended needles.
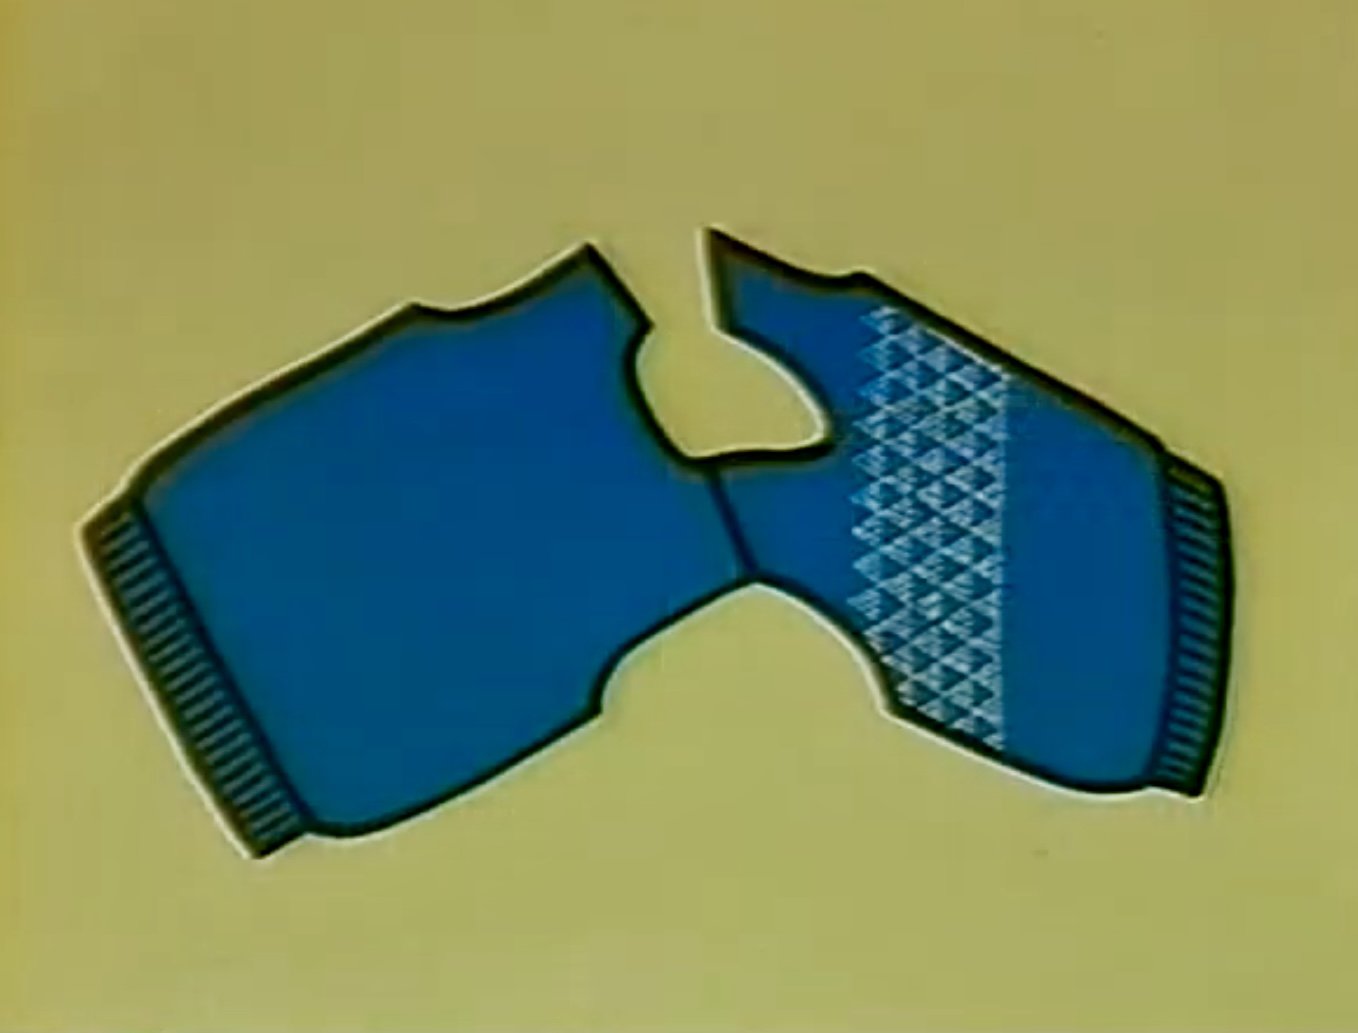
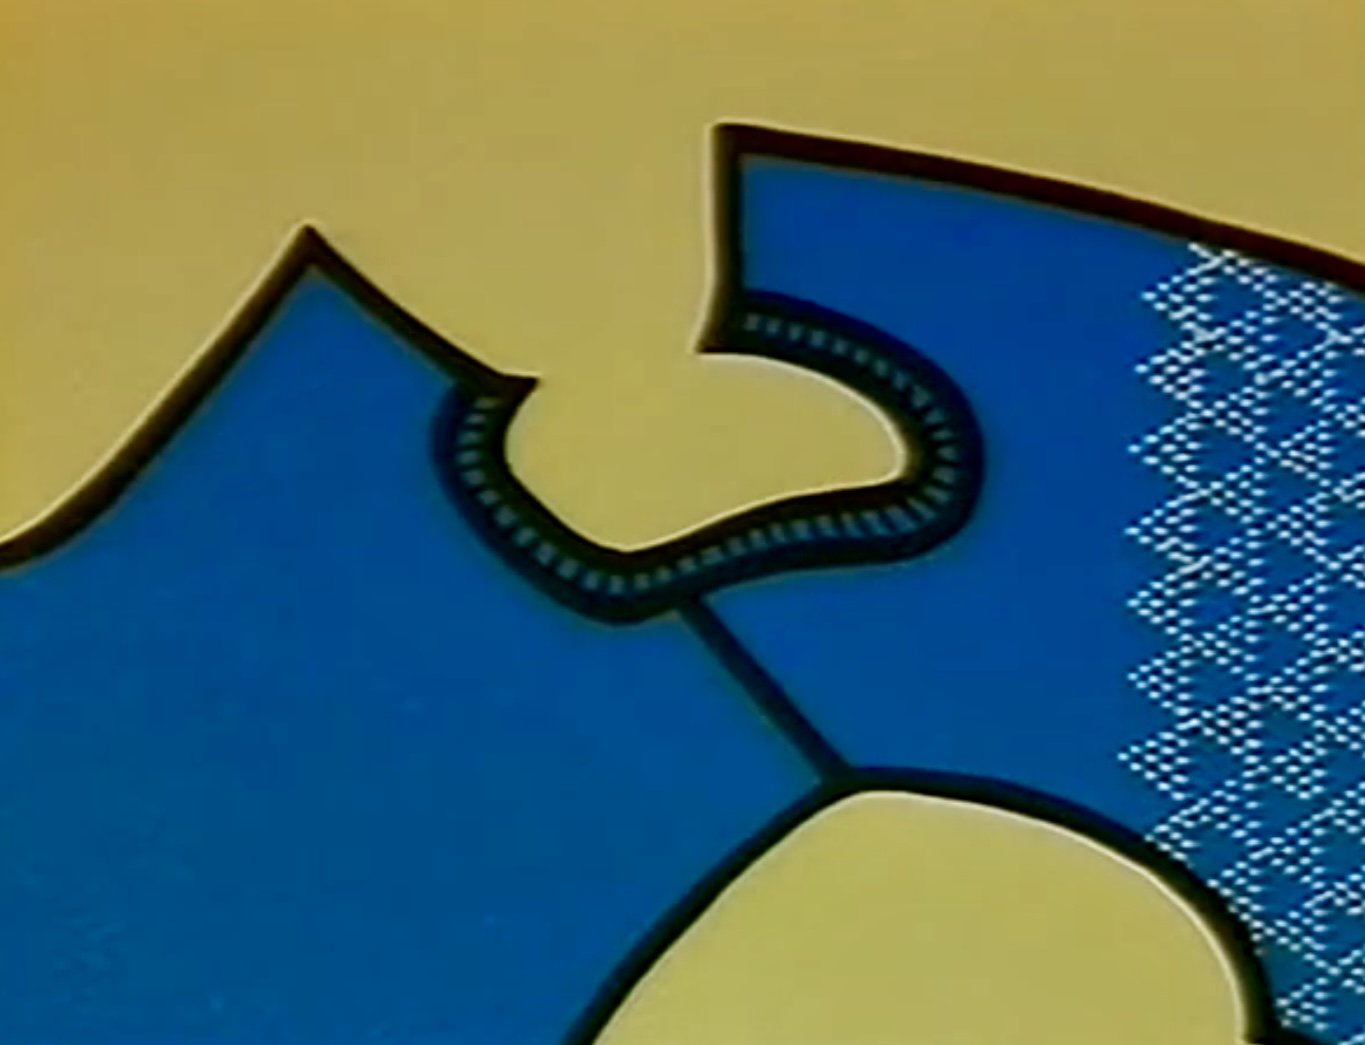
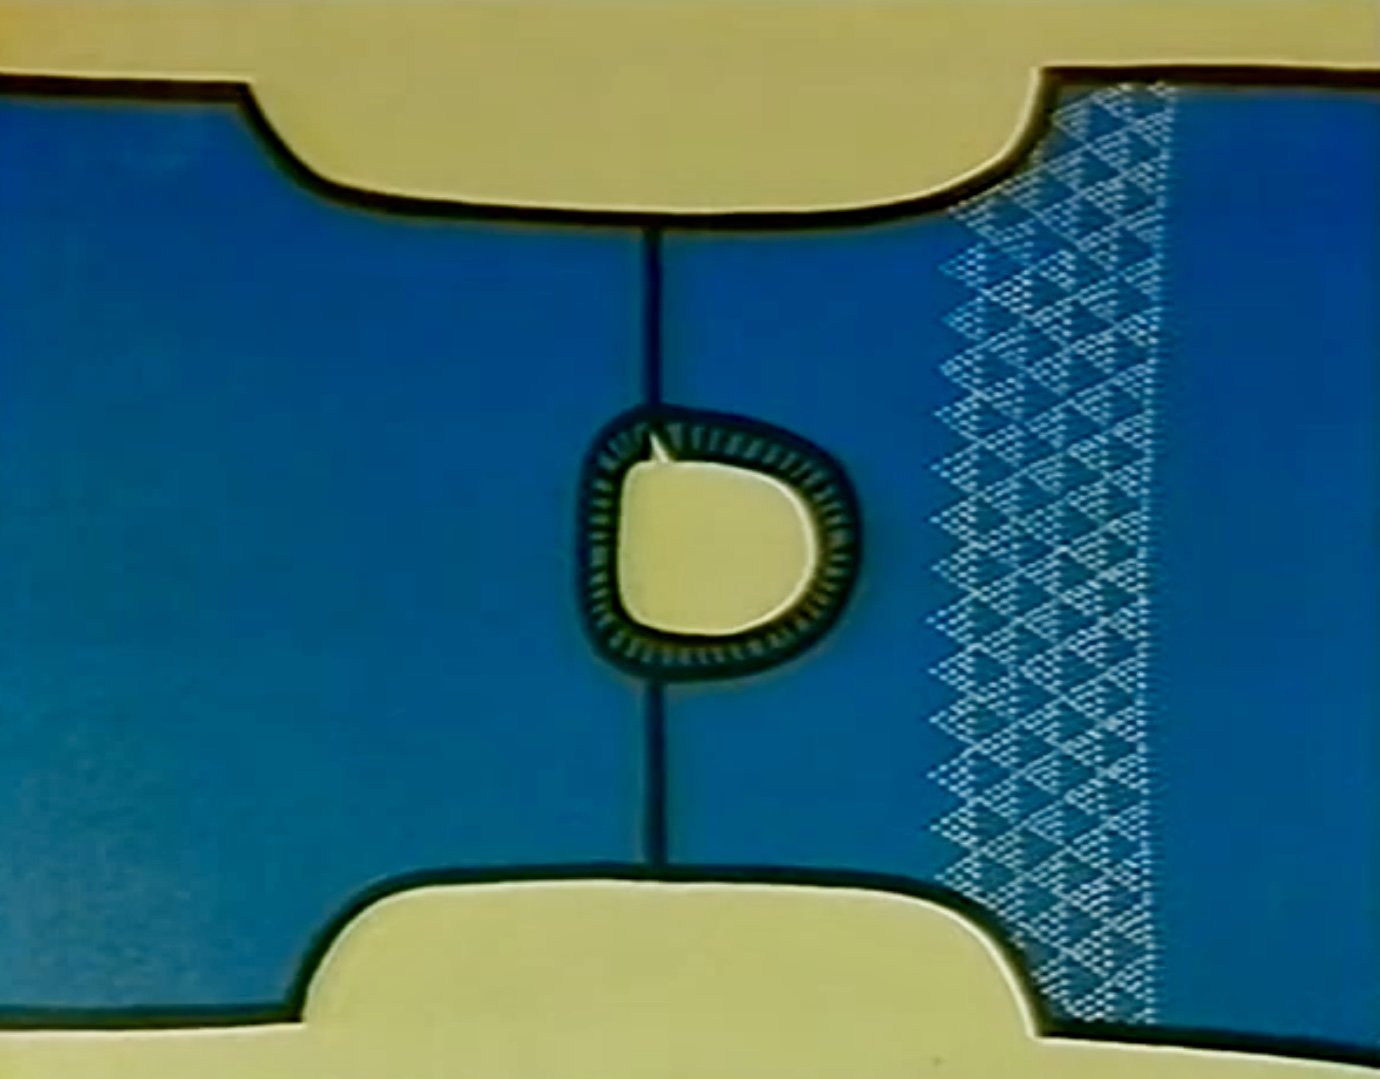
(TIME MARK 22:02) From the back neckline knit the right and left shoulders separately. If you have the carriage on the right side then knit that side first. To do this move the left needles to the D position and hold the stitches in place to knit the right. While partial knitting the shoulder shape the back neckline by following the contour line, shaping the armhole. After you have finished the right shoulder push the needles for the section to the C position and knit 5-6 rows with waste yarn. Remove weight and section from the machine. Return empty needles to the A position. Now return the pattern paper to the beginning of the back neckline. (TIME MARK 23:55) Reset the change dial (far right dial) to the STOP setting (3 o’clock setting). Put your yarn mark to center zero. Push the needles for the back neckline center straight section to the C position and work 5-6 rows waste yarn. Again remove that section from the machine and push the empty needles back to the A position. (TIME MARK 24:16) Far right change dial back to original setting - knit the left should exactly the same with shaping reversed. Now the back is all completed except for the welt. The welt will be knitted in knit 1 purl one later on.


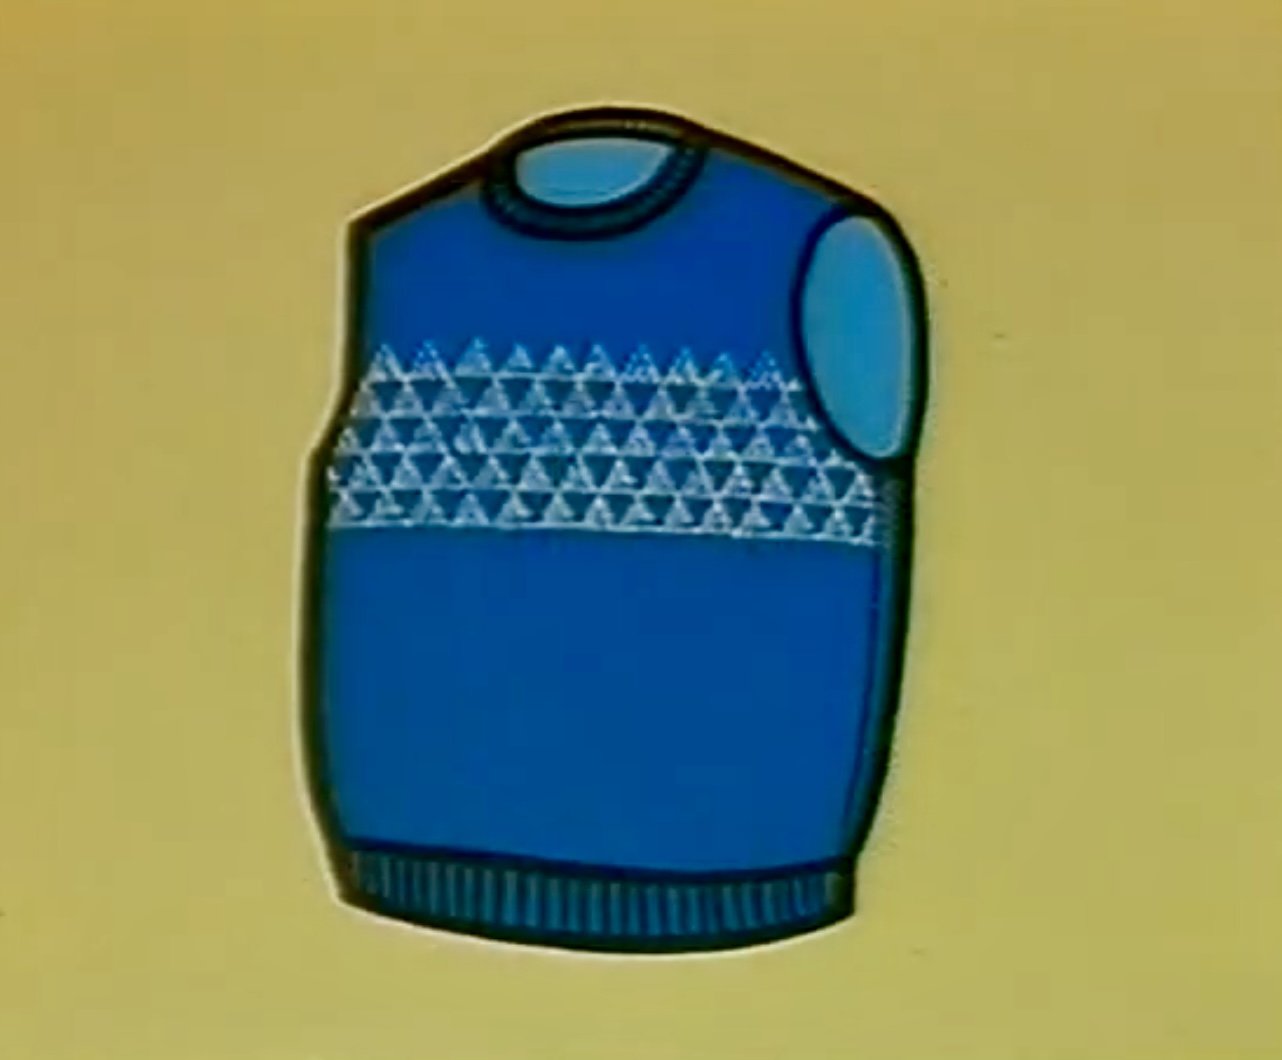
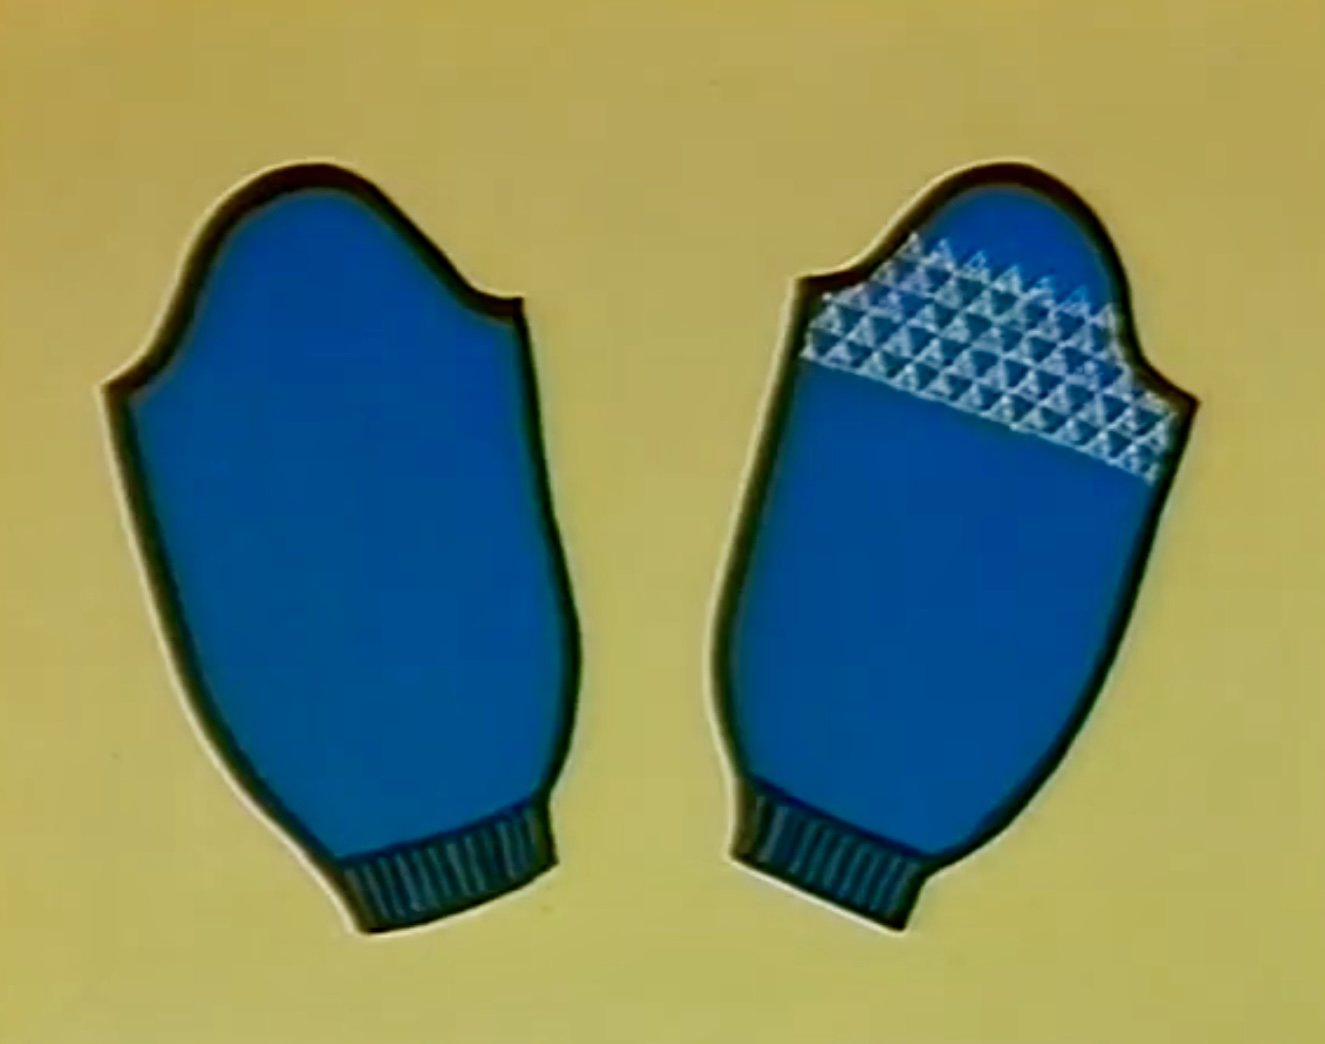
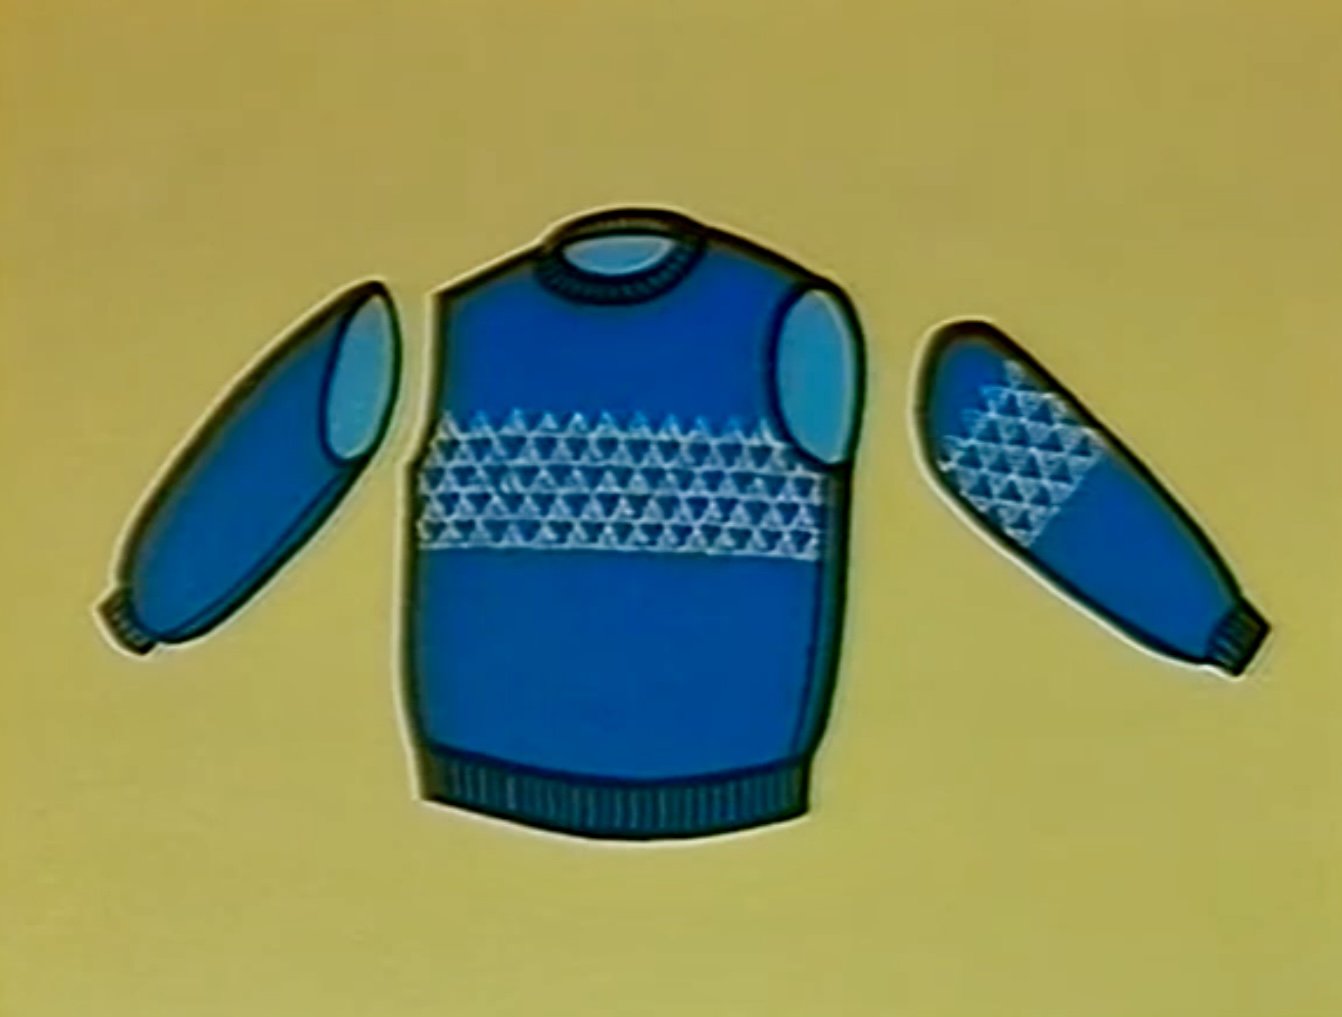
KNITTING THE FRONT (25:01 time mark) The front of the sweater can now be knitted with stockinette and fair-isle. With fair-isle we use two different yarns at the same time. First select one of the standard machine punch cards. Example uses punch card No. 10. Select a contrast yarn. Start with the punch card loaded in the A alignment. Insert punch card and connect table. Left punch card setting is in the down position to memorize the pattern. (Memorizing is noted with side levers up as we are working in stockinette). CARRIAGE is on the LEFT - move to the right to memorize the pattern. Set carriage for fair-isle, release card (lift the left punch card setting from down to up). Open the yarn holder - change to the white yarn in A feeder and blue yarn in B feeder.
If you have problems getting a proper end stitch - move the end needle on the carriage side to the D position before knitting the row - with the needle out and the cam set to fair-isle only the yarn in feeder two will be knitted. Make sure you’ve fully moved the carriage so each row is noted. (TIME MARK: 27:33). Punch card tip: perforated holes control yarn feeder two, non-perforated holes controlled by yarn feeder one.
We first knit a swatch with 60 rows of fair-isle and a few rows of stockinette then remove from machine to get an idea of the size. Begin by marking your starting pattern position on the paper pattern. on the front. Since the tension gauge is nearly identical for fair-isle as stockinette - same settings.
If using tuck, slip, punch lace or others you must take a separate tension gauge.
Set and lock the paper at the front above the line of the welt just like we did at the back. Now set and lock punch card at row one. Knit to pattern position as we did on the back. Then work fair-isle as planned. After placing yarn in feeders knit fair-isle to the arm holes shaping. To shape the arm hole, decrease the stitches on both sides of the fabric by following the contour line. when decreasing two or more stitches in fair-isle, you must take the end stitch and transfer to the adjacent needle, put the needle into the D position and then (TIME MARK 29) feed the yarn path into the latch to manually make a stitch (two together) continue. After pattern knitting remove both yarns from the yarn feeder, feed the blue yarn as the main yarn and knit up to the front neckline in stockinette. We must knit the right and left sides of the necklines separately. The front, unlike the back must be shaped in sections therefore we must use a different method of holding stitches - the reason for this is that there are two many rows to knit from the beginning of the neckline to the shoulder sections - so the fabric may become askew or even worse - ruined. To avoid this we must remove the sections to be held from the machines with waste knitting and then continue knitting on the carriage side. Your yarn mark should be at the center of the front neckline. Now following the contour line decrease stitches to shape the front neckline and do partial knitting to shape the shoulder. After you’ve finished the first section, knit 5-6 rows of waste yarn and then remove the section from the machine. The next step is to return the pattern paper (TIME MARK 31:41) to the beginning of the front neckline and take the last row of stitches from the other front section being held in place with the waste yarn and load those stitches back onto the needles. When you do this ensure to push the needles with stitches to the B position to stop stitches from falling out. Once all needles are loaded, remove the waste yarn. We knit this section in the same manner except our shaping is done in reverse. This completes the front of our pullover. The welt will be knitted in K2P1 rib later on.
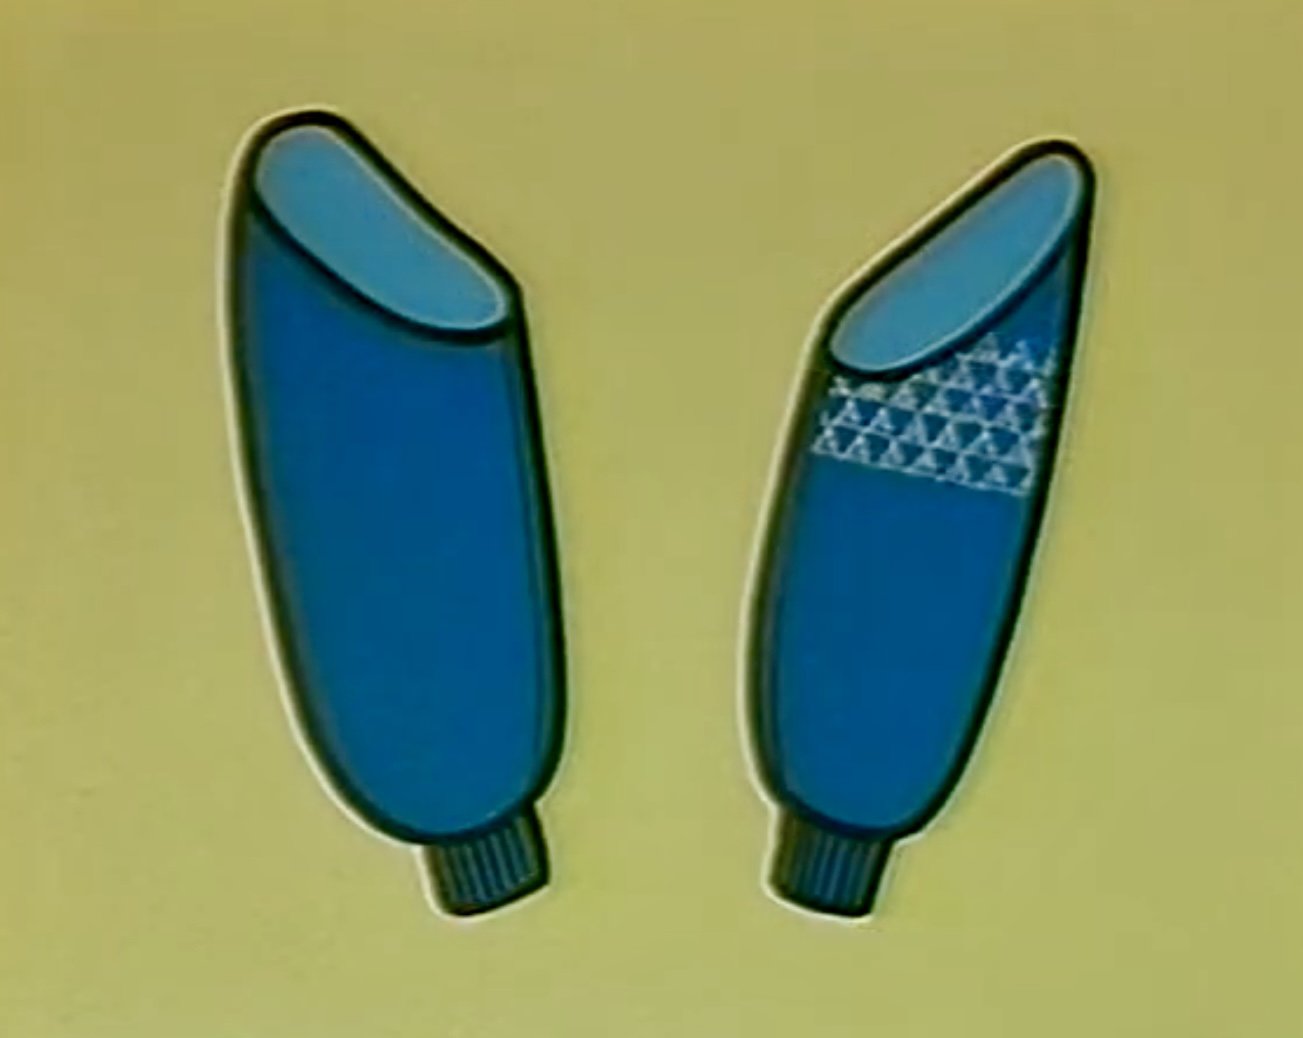
Knitting the sleeves - (Time mark: 32:43) - Now that we have the front and back done we will start with the right sleeve which is knitted in stockinette followed by the left sleeve that is knitted with stockinette and fair-isle. First set the pattern paper for the sleeve into the knit contour and lock it at the line above the cuff. 5-6 rows waste knitting then switch to main yarn again following contour line but increase the stitches to shape the underarm. We will use a fully fashioned increasing method to shape the under arm. This method makes joining easier by blind stitch. Fully fashioned takes the two stitch prong transfer tool and moves the outside two stitches out one needle and a purl bump is hung on the empty needle. The sleeve cap (shoulder top area) is created by decreasing following the contour line. Put your yarn mark at the center of the sleeve cap using contrast yarn (even if not on a stich but a stitch bar). Then cast off the remaining stitches using the same method of transferring on stitch to the neighbor and using the yarn path to make a stitch going through both stitches on that one needle. Remove the cast off piece from the machine. Now we mark our starting pattern position on the pattern sleeve paper page for pattern knitting of the left sleeve. Set and lock punch card at row one. Set the pattern paper and knit up to the pattern knitting position as you did for the right sleeve. Knit fair-isle as you did the front. Once again follow the contour line and shape the contour arm with the fully fashioned increase method. We then shape the sleeve cap by decreasing in the same manner as we did for the other arm hole. Return to stockinette and finish knitting the piece shape. Now both sleeves are done. The cuffs like the welts will be knitted later.


Knitting the Welt - (Time mark 36:35) - Before we start knitting the welts and the cuffs, we must lightly press each piece. This is because the fabric hasn’t settled into its correct sizing. Must be done before joining. Pin and lightly press. Now we knit the back welt in k1p1 rib we start by placing the pattern paper for the back at the starting line of the welt. Push the required number of needles to the B position and pick up the first row of stitches onto the flat bed with the purl side towards you.
Set the stitch dial two numbers lower (ie. from 7 to 5) to make rib stitch tighter. Reset the Knit contour row setting to a 10% higher setting than tension gauge reading for stockinette (ie from 41 to 45). Knit from right to left. Knit the required number of rows. To make the K1P1 rib use the latch hook to form every other stitch in this manner: Enter the hook at the area where we will have the ribbing border the knitting. Now drop that column to that area and then reform all the way back up to the top stitch placing that stitch back on the needle. Repeat as needed. Leave the end of the yarn 3x longer than the width of the back welt for closing up the last stitches.
Now setting the carriage: cam lever to SLIP, Side levers to DOWN to the circle icon, Russell levers to II setting. Push needles with reformed stitches to the D position. then knit one row waste yarn. Change cam lever to stockinette work 5-6 rows. Now remove fabric.
Pull ravel cord out. Knit front welt and cuffs as we manually did already.
Since the cuff is narrower than the sleeve we must pick up and place the stitches in the following manner. (TIME MARK 40:55) Push the required number of needles to the B position. Then pick up the stitches from the first row of the sleeves main knitting and place them onto the needles in the B position in order to decrease stitching to fit the cuff.
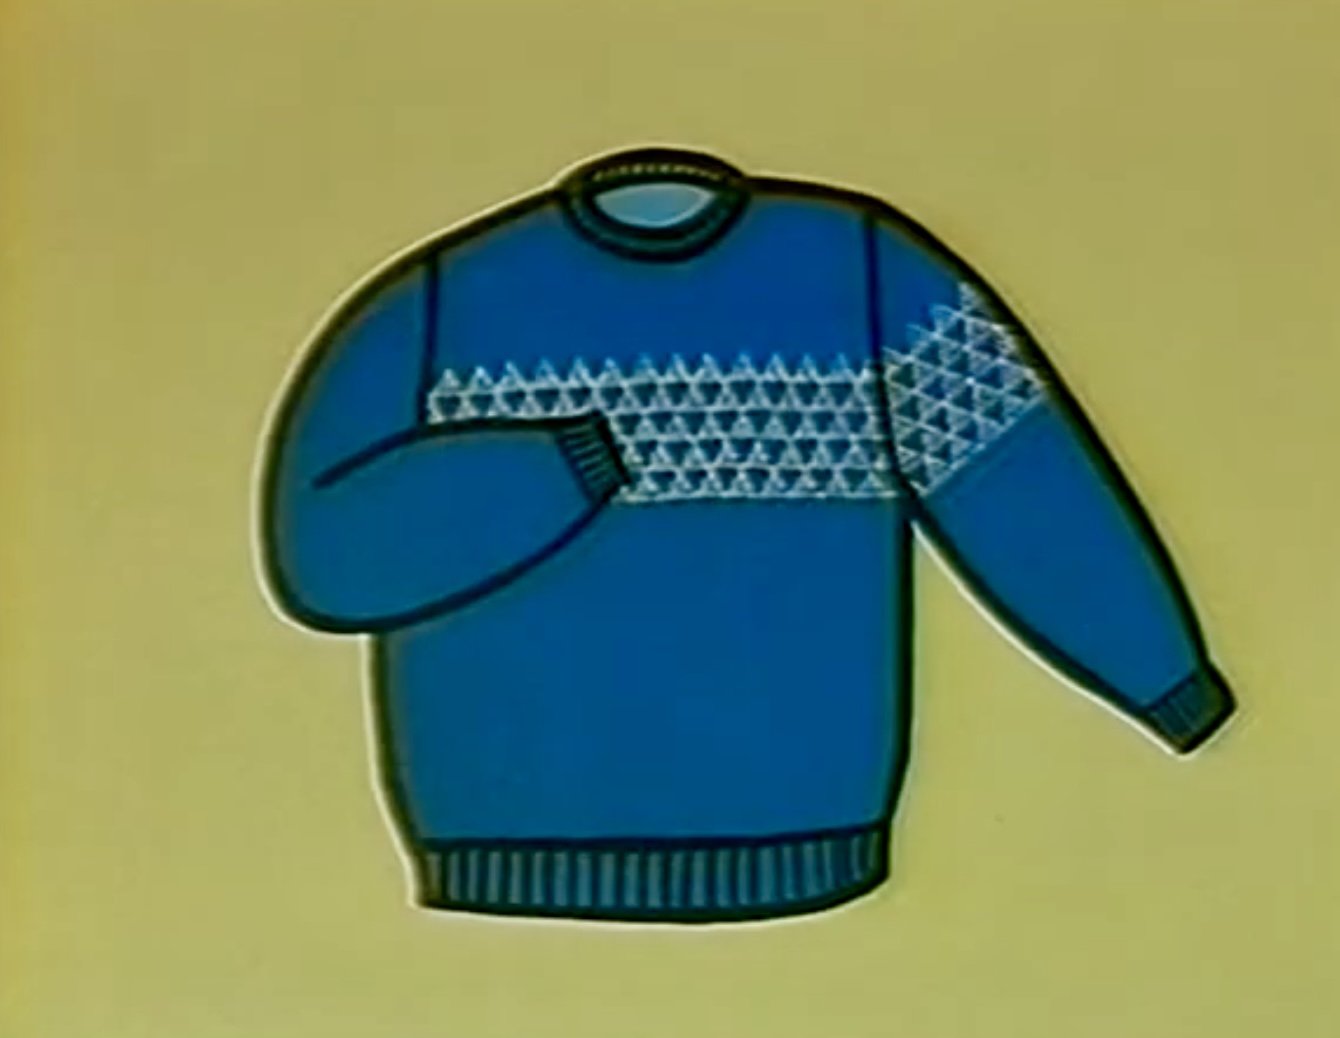
Joining the Pullover sections - Okay so now that we have the front, back and two sleeves knitted let’s put them together. First let me give you the order in which we will be doing the joining. Begin by joining the front and back segments at the shoulder sections. Start tat the back section of the right shoulder. Knit the beck band in k1p1 rib, close the last row of stitches for the welts, cuffs and neckband, and then join the left shoulder sections. This will be followed by joining both ends of the neckband and the side seams of the back and front by blind stitch. We will then join the underarm seams and finally set in the sleeves.
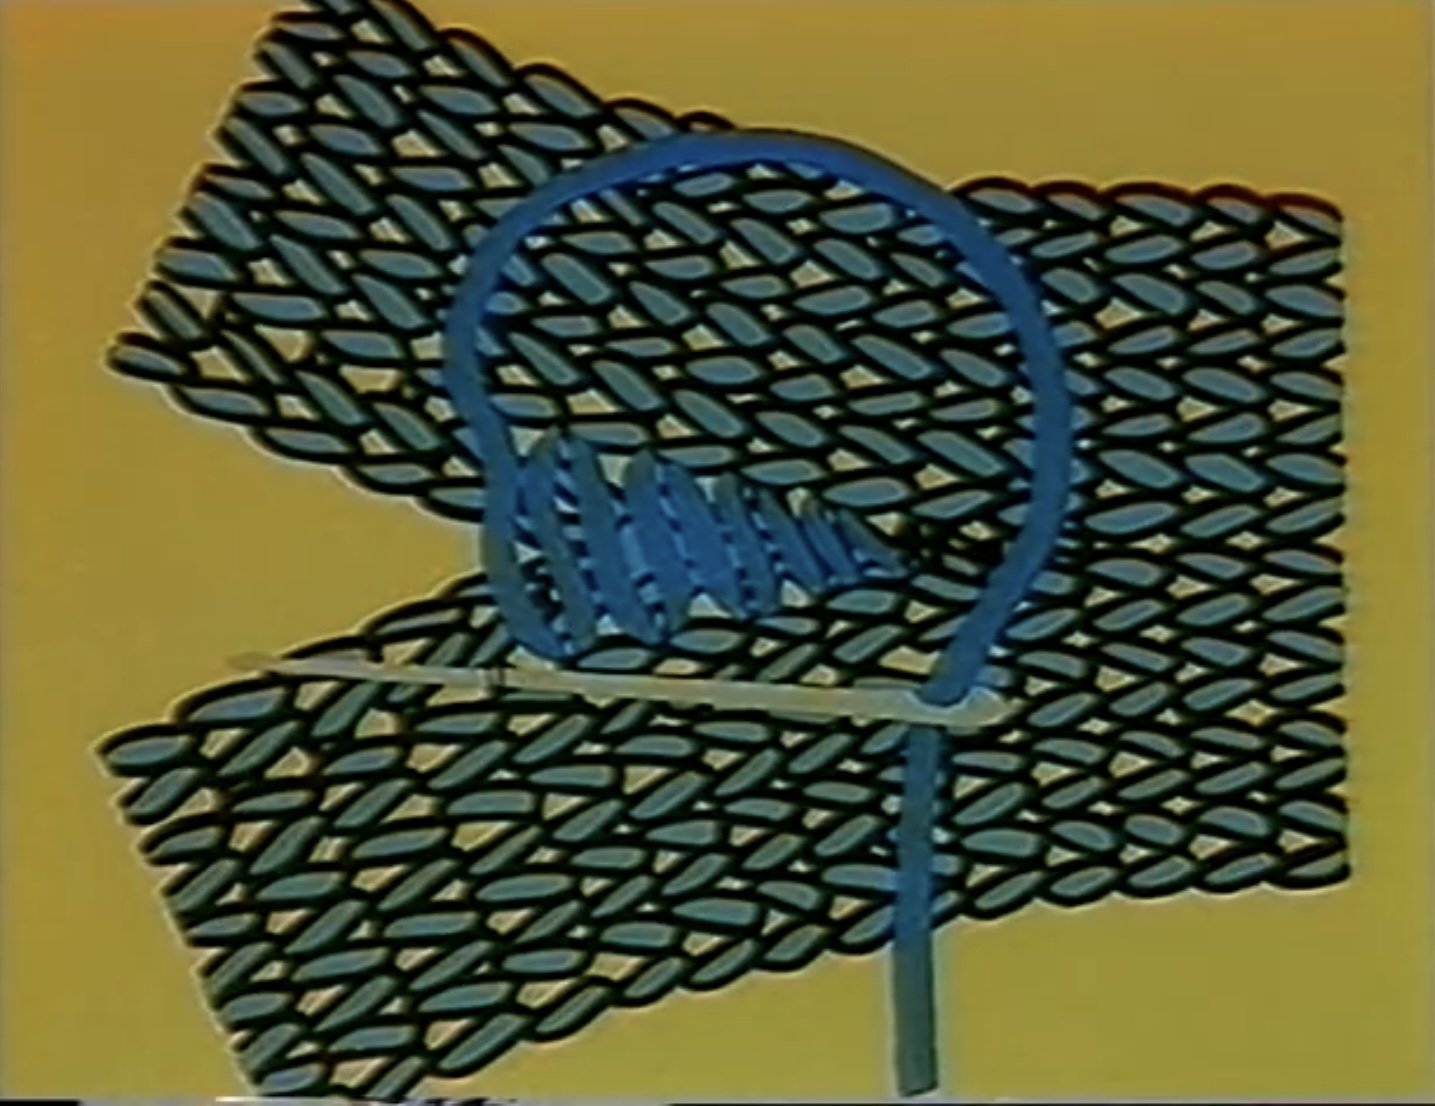
Begin with the right shoulder. Push the same number of needles as the shoulder stitches to the B position - pick up the main yarn stitch of the back section of the shoulder with the right side facing you and place them onto these needles. Then pickup the main yarn stitches of the front section of the shoulder with the opposite side facing you and place them onto these needles. Unravel the waste. Push the needles to the D position keeping the back panel against the gate pegs behind the latch while keeping the front section in the hooks themselves. Push the needles back into the B position so that the stitches behind the latches slip off the needles and over the stitches in the hooks. Now using a darning needle with the yarn tail close the stitches with a darning needle using the back stitch method - removing the fabric from the machine.
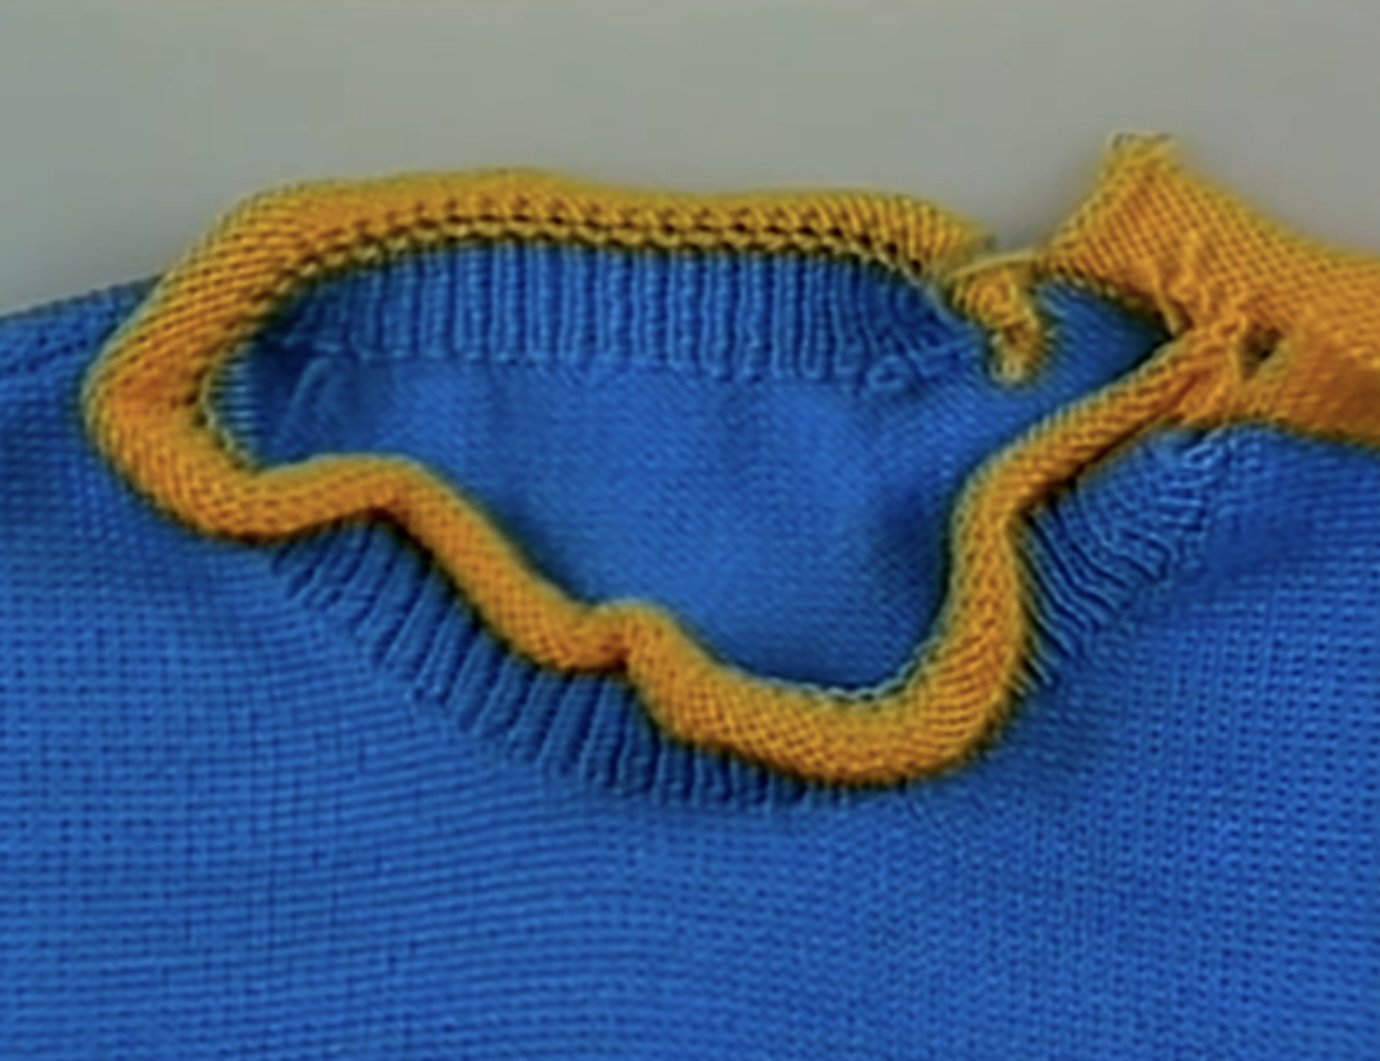
Knit the neck band - we first set the pattern paper at the starting line for the neckband. We must exchange the stitch scale for one with 10% higher number than the one we used for knitting stockinette. Set the stitch dial and the row number dial a the same setting we used for the welts. (45 rows.) Push the required number of needles for the neck band to the B position. With the reverse side of the front and back facing you pickup the neck edge and place them onto the needles in the B position. Knit the neck band as you did the welts and cuffs. That completes the neck band. Use your darning needle -
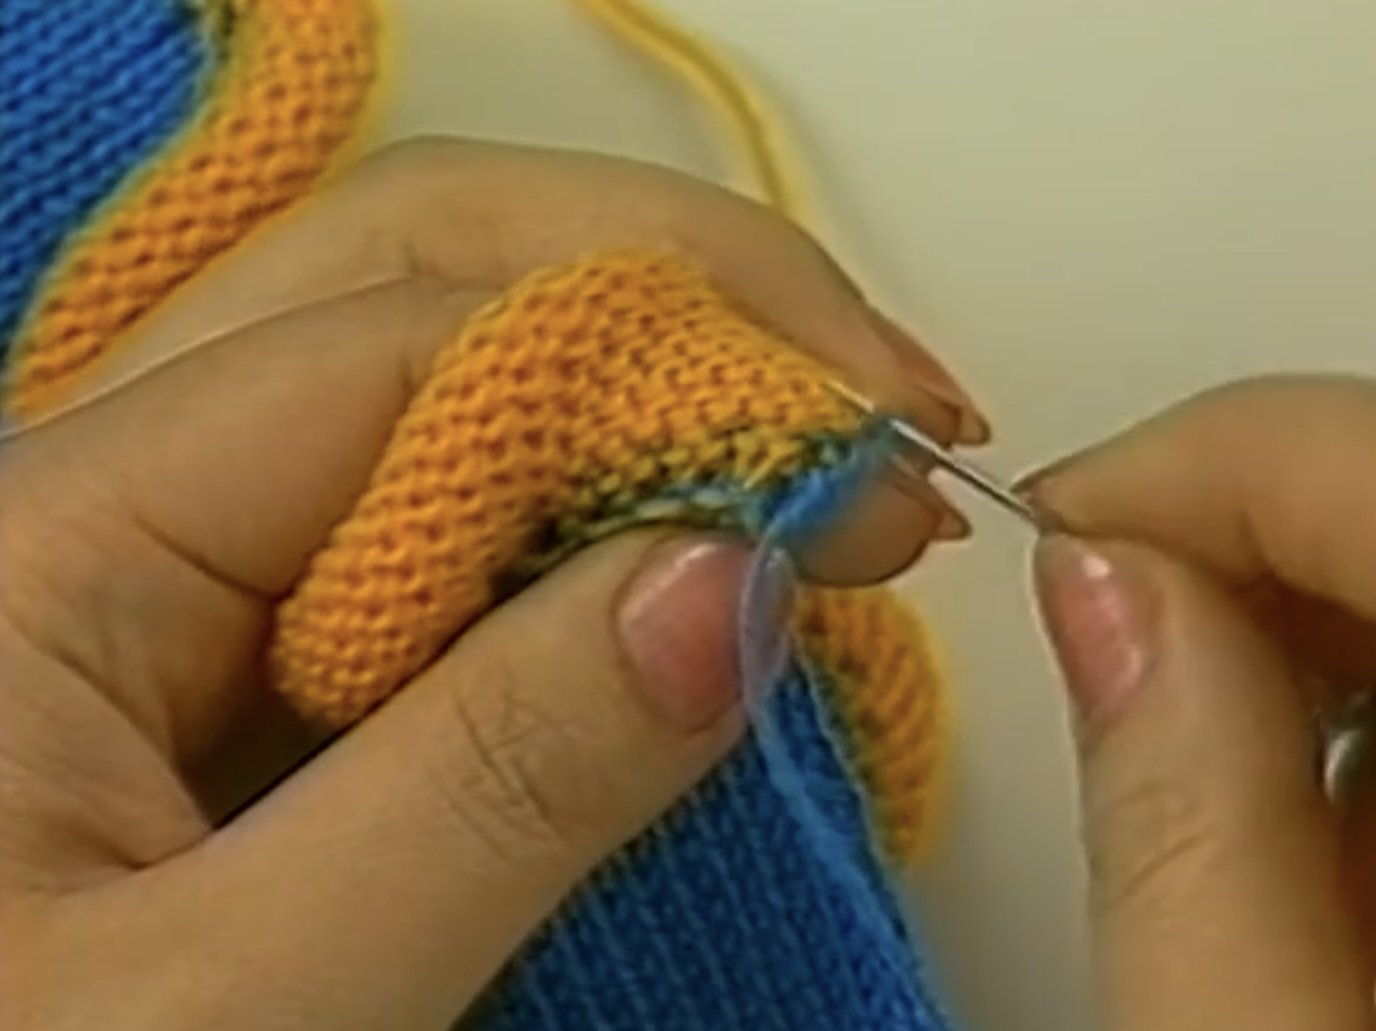
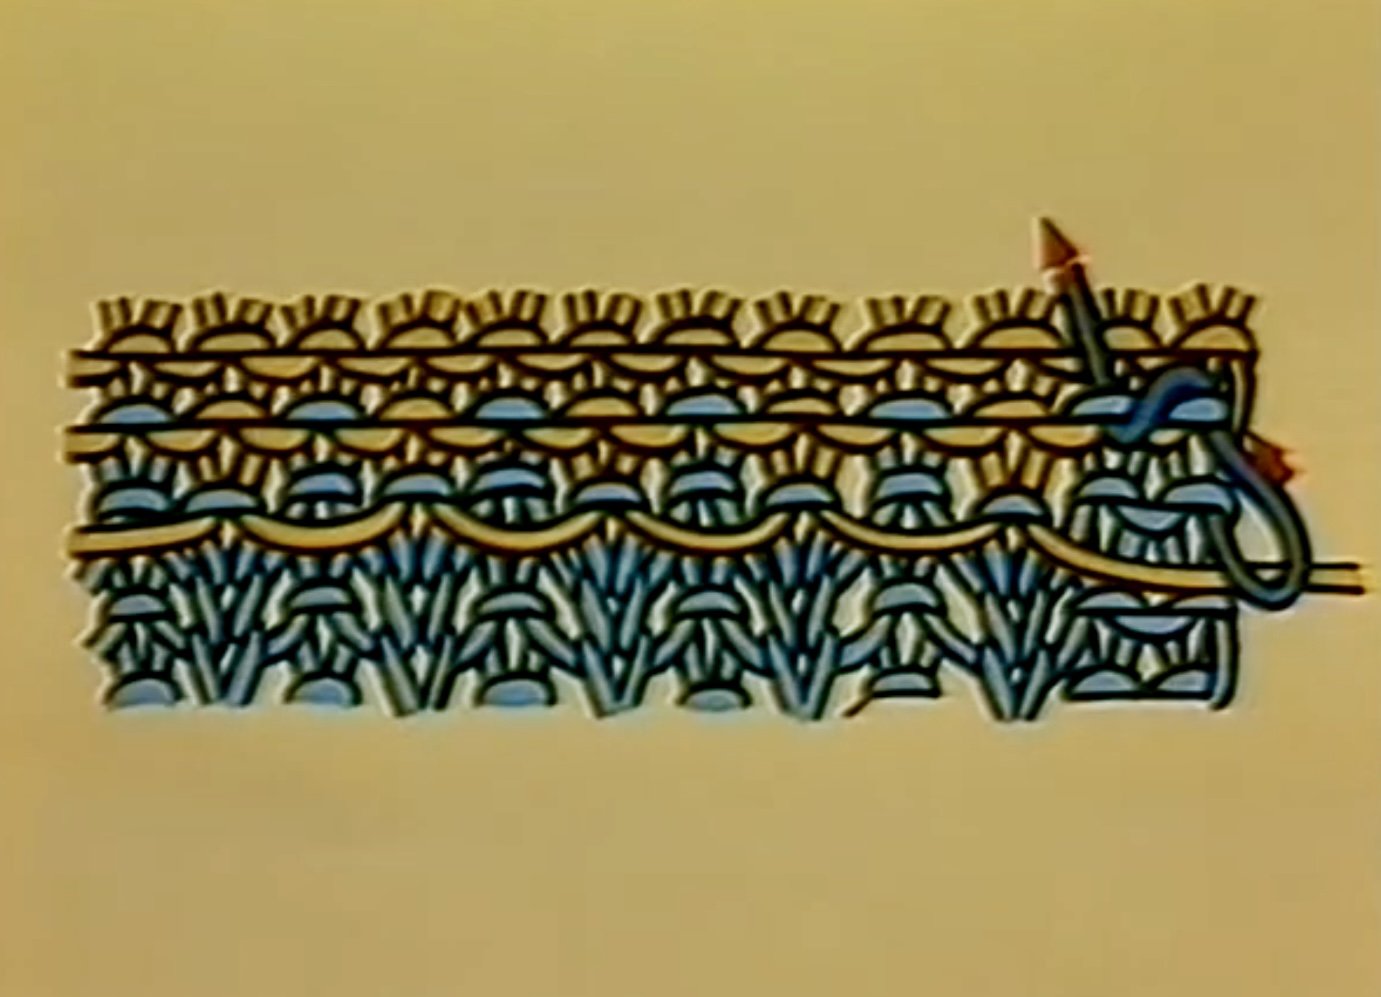
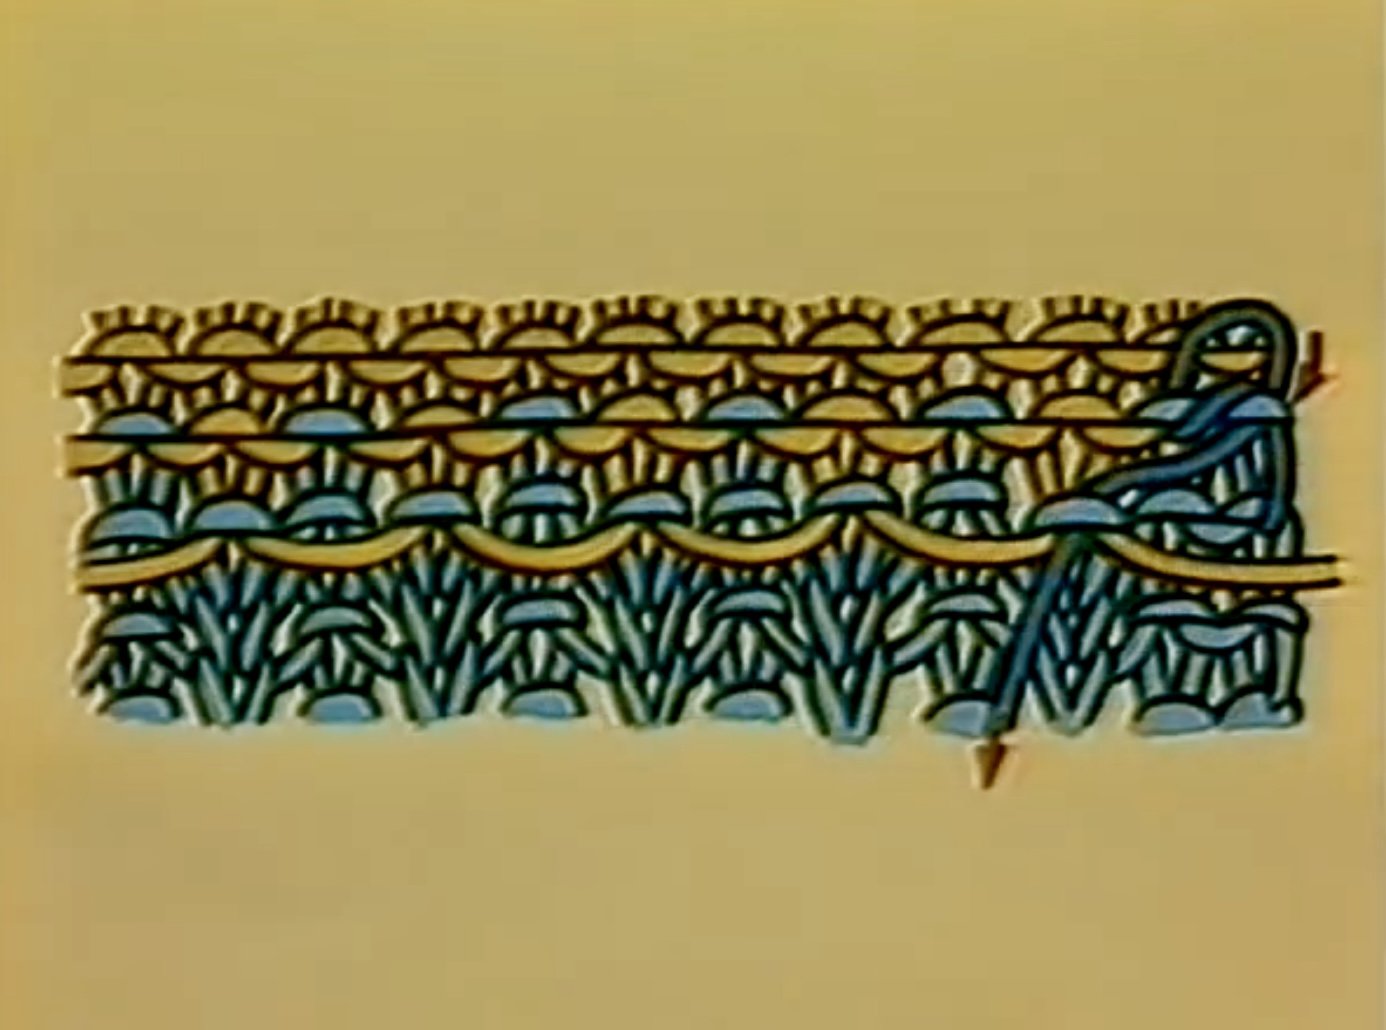
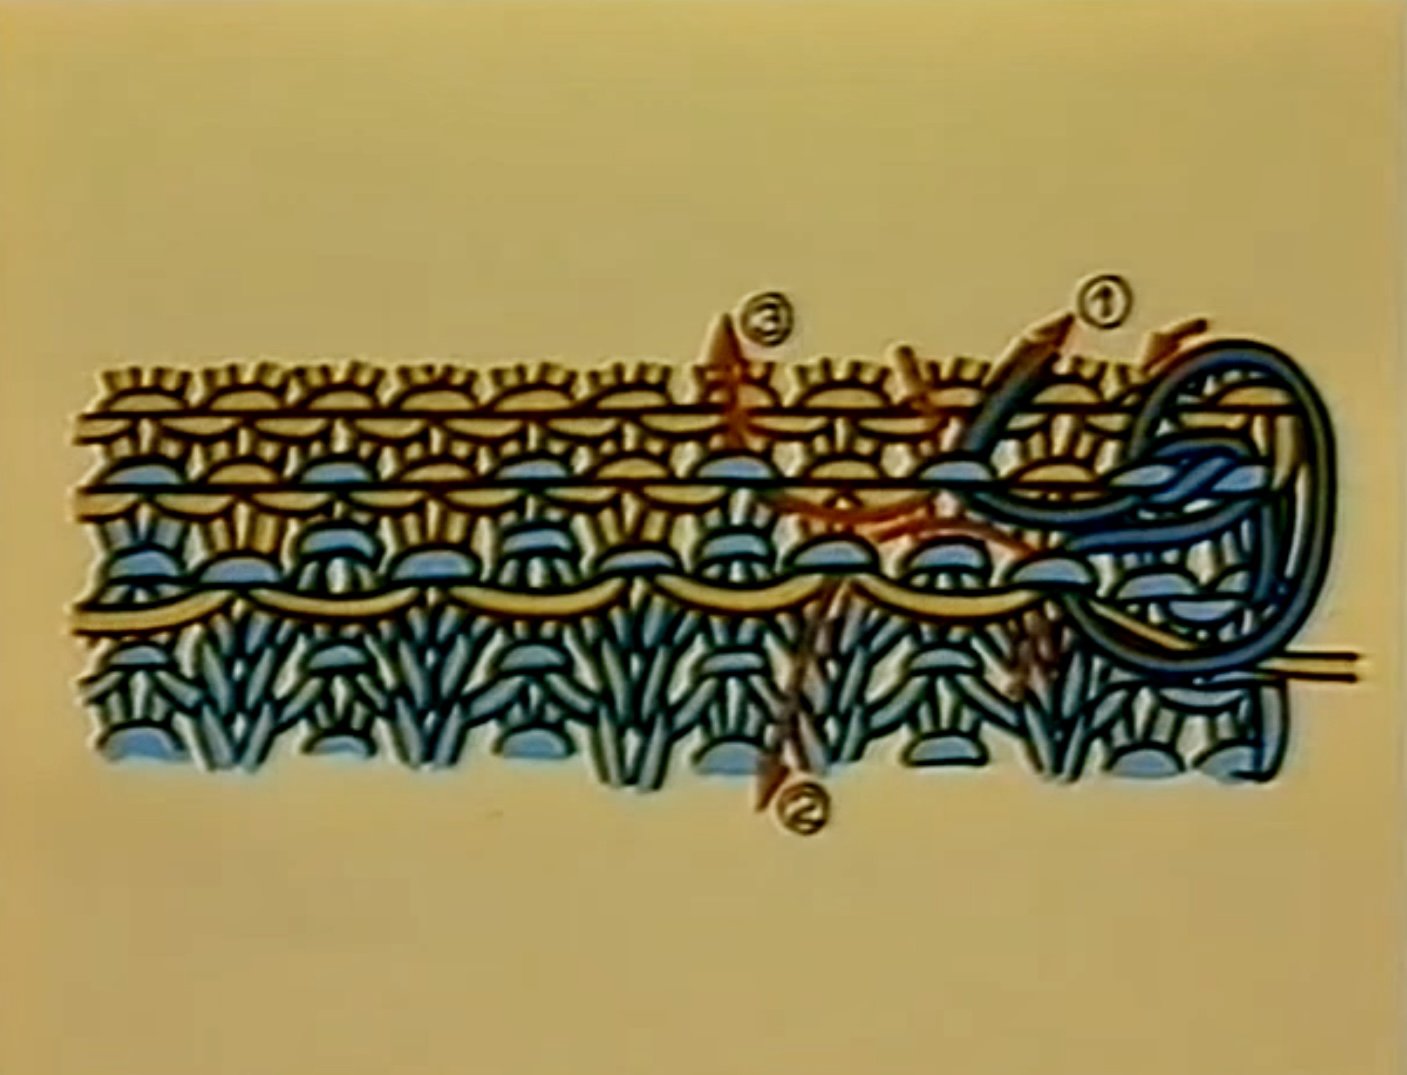
Close the back rows of stiches on the back welt. DIAGRAM
Using the darning needle insert the yarn into the first stich from the front. From the front again guide the yarn into the second stitch next take the yarn back to the first stich from the back and then over to the third stitch. Go to the second stitch again and then pull out the yarn at the forth stitch. After you have done this procedure for all the stitches you then unravel the waste yarn.
(TIME MARK 46:26) With the back welt now completed we then use the same method to close up the last stitches of the front welt, cuffs and neck band. Now for joining the left shoulder sections which is identical for joining that was done on the right.
Next I will explain the blind stitch method of joining the side seams, both ends of the neck band and the underarm seams. We begin by threading a darning needle with our main yarn, with the right side of the fabric facing you, pick up each sinker loop between the last two stitches of the edge. Do this for every other row and then pull it tight to close up the stitches. Now we’ve come to setting in the sleeves.
Using waste yarn and a darning needle Place two lines of stitching along the sleeve cap. Then draw the threads just enough to fit the sleeve cap to the arm hole. Neck pin sleeve in the arm hole in close intervals matching seams. Then do short stitch basting. Set sleeve with slip stitch method using crochet hook and main yarn. insert hook along and create crochet seam. When done remove basting. Turn inside sleeve to same orientation to inside out sweater. Still some finishing touches to complete. Using a darning needle work yarn tails into seams. Final light iron pressing.
Pullover complete!